While Voyage collects various attributes about your subscribers, you may have other attributes that you have gathered through other platforms (e.g. age, email address, etc.). Our attribute import functionality enables you to upload these additional attributes and use them when creating segments.
This guide walks you through to correctly importing custom attributes and successfully using them when creating segments.
Create and Format Your List
In order to upload your attributes, you'll first need to prepare them in a CSV file using a spreadsheet application such as Microsoft Excel or Google Sheets.
Each column in the file should represent one set of attributes (e.g. one column for age, another column for email address) and contain a header.
We have a CSV template that you can use to help format your file correctly.
Column A
The first column in your sheet should contain the phone numbers of the subscribers for which you will upload attributes.

Note: attributes will only be imported for phone numbers that match your subscriber database in Voyage. If you upload phone numbers that are not subscribed to your SMS program, the attributes will not be imported.
These phone numbers should be formatted as +1##########. For example:
+12025550115
Be sure there are no parentheses or hyphens in the phone numbers. The following are examples of phone number formats that will be rejected:
+1-202-555-0169
202-555-0131
(202)5550104
Column B and Beyond
Each additional column will serve as a set of attributes to be imported.
In the example below, column B contains the age of each subscriber while column C contains the email address.
Make sure to give each column a header as you will need to identify each attribute when uploading the CSV file to the Voyage platform.

Attribute Data Types
These are the following types of attributes that you can import:
Boolean - Must be either a TRUE or a FALSE value.
Number - The underlying numeric data type may be integer, decimal, float, double, etc. For most applications it is sufficient to know that the value is a number.
Text - A string value.
Date - YYYY-MM-DD
Saving as CSV
When you are done, save your file as a CSV. Here are instructions on how to create CSV files for popular spreadsheet programs:
Be careful when creating your CSV file, as it may contain extra information that is not recognized by the Voyage system. In the screenshot below, the file contains data in the columns to the right of the Segment1 column and will be rejected. Since the fields are blank, it may be hard to notice in some spreadsheet programs. Deleting those excess columns and saving again as a CSV will resolve the issue:

Tip: Viewing your CSV file in a plain-text editor such as notepad can reveal this kind of problem.
Upload CSV to Voyage
Now that your CSV file is ready to upload, navigate inside the Voyage web app to the Segments main menu [1]. Here is where you can see a list of existing segments (if any) and click on Import Attributes at the top [2]:

You can download a handy CSV template here [1] to double check your format, or continue to uploading your own CSV file [2]. After uploading, click the blue Next [3] button to proceed:

On the next screen you'll edit the tag names for each attribute. On the left-hand side, you will see the column headers from your CSV file [1] and on the right-hand side, you will be able to edit the name of the attribute in the Voyage app.
Spend some time thinking of concise, descriptive tags [2] as this text is the only thing you'll see later when using this upload to create a segment. When done click Next [3]:

You will see an Import in Progress message:

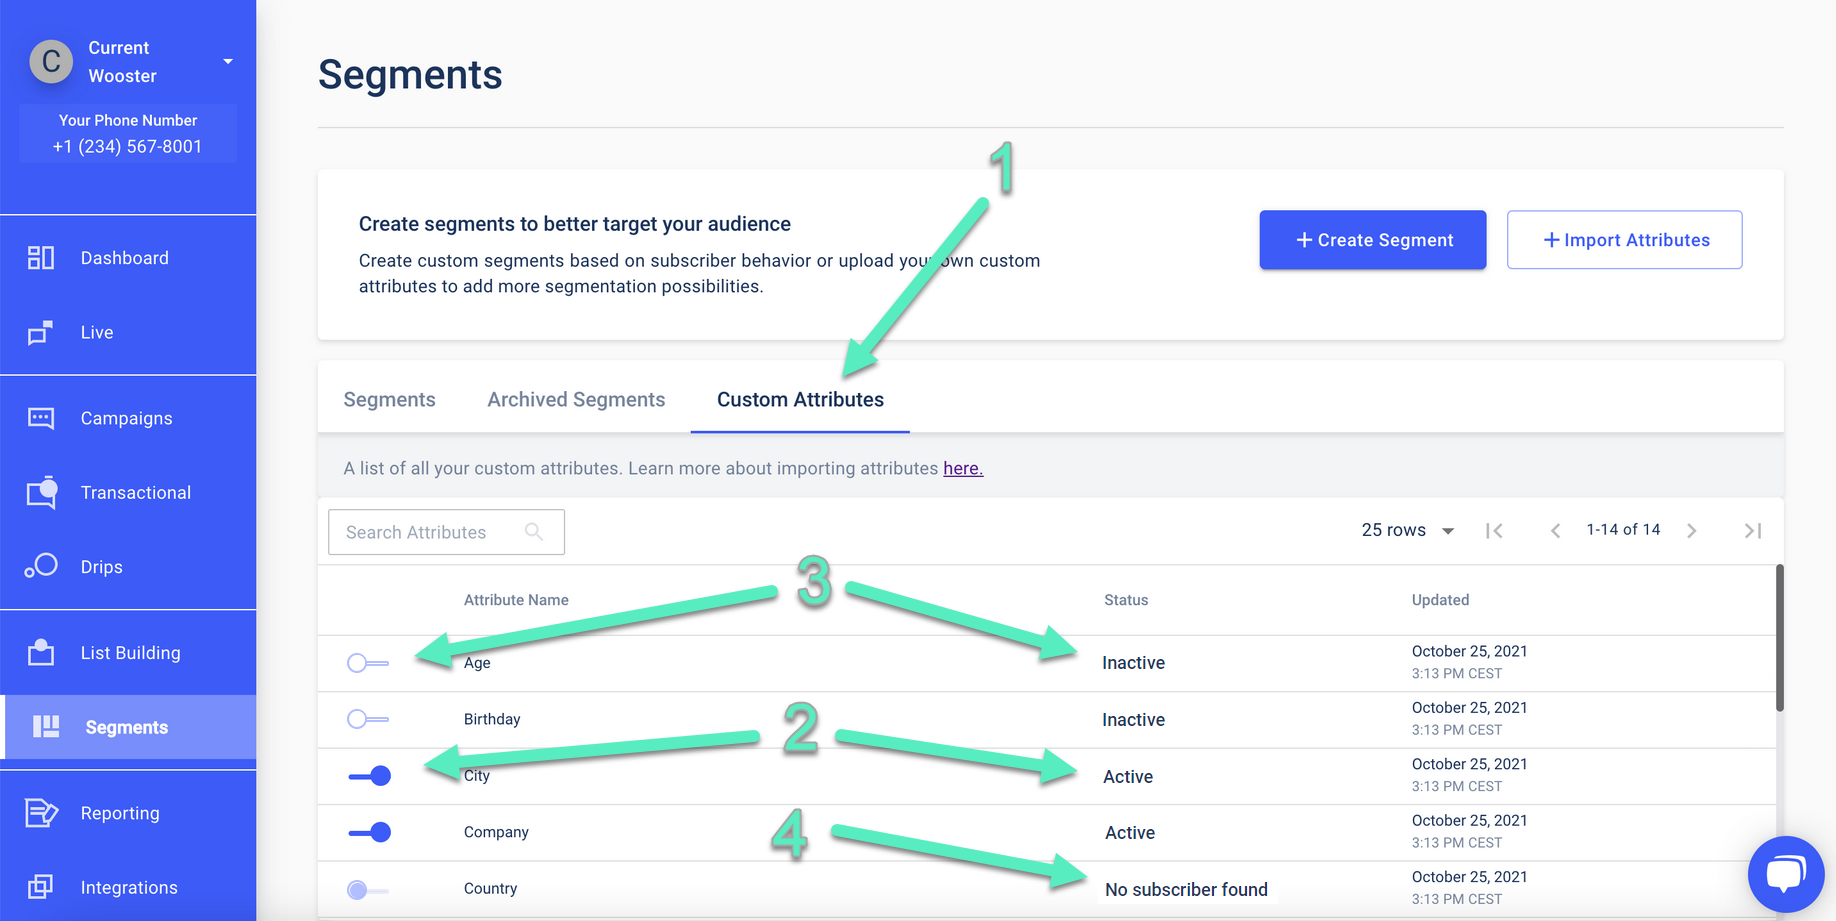
Head over to the Custom Attributes tab [1] to see your newly imported attributes once they have been successfully uploaded.
Once your attributes have been imported, you will be able to set them as active [2] (i.e. visible when creating segments) or inactive [3] (i.e. hidden when creating segment) using the toggle on the left.
If none of the phone numbers in an uploaded file match your subscriber base, you'll see a "No subscriber found" message [4] under the Status column:
Tip: It is possible to give two different manual segments the same exact name/tag. Double check for already existing tags before uploading and naming new tags to avoid this situation. You can also deactivate existing tags with duplicate names.
Create the Segment in Voyage
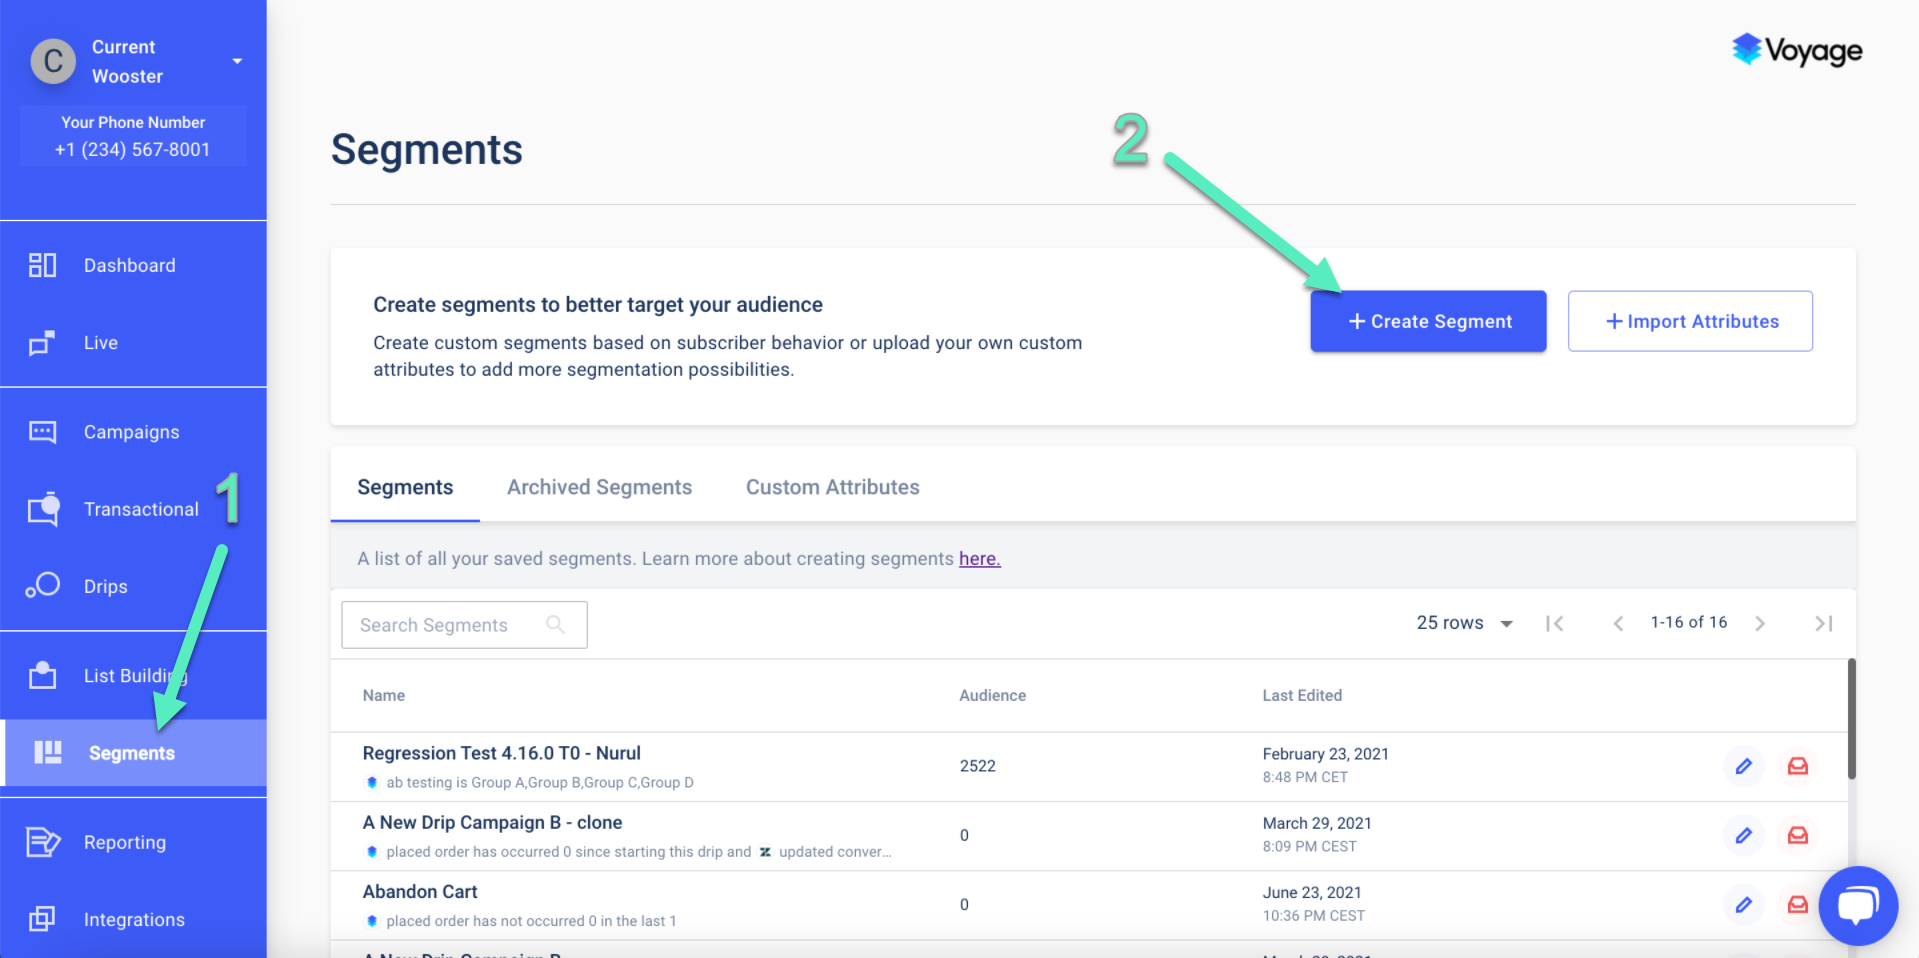
Now that you have imported your custom attributes, you can use them to create segments. To do that, navigate to Segments [1] then click on Create Segment in the top right corner [2]:
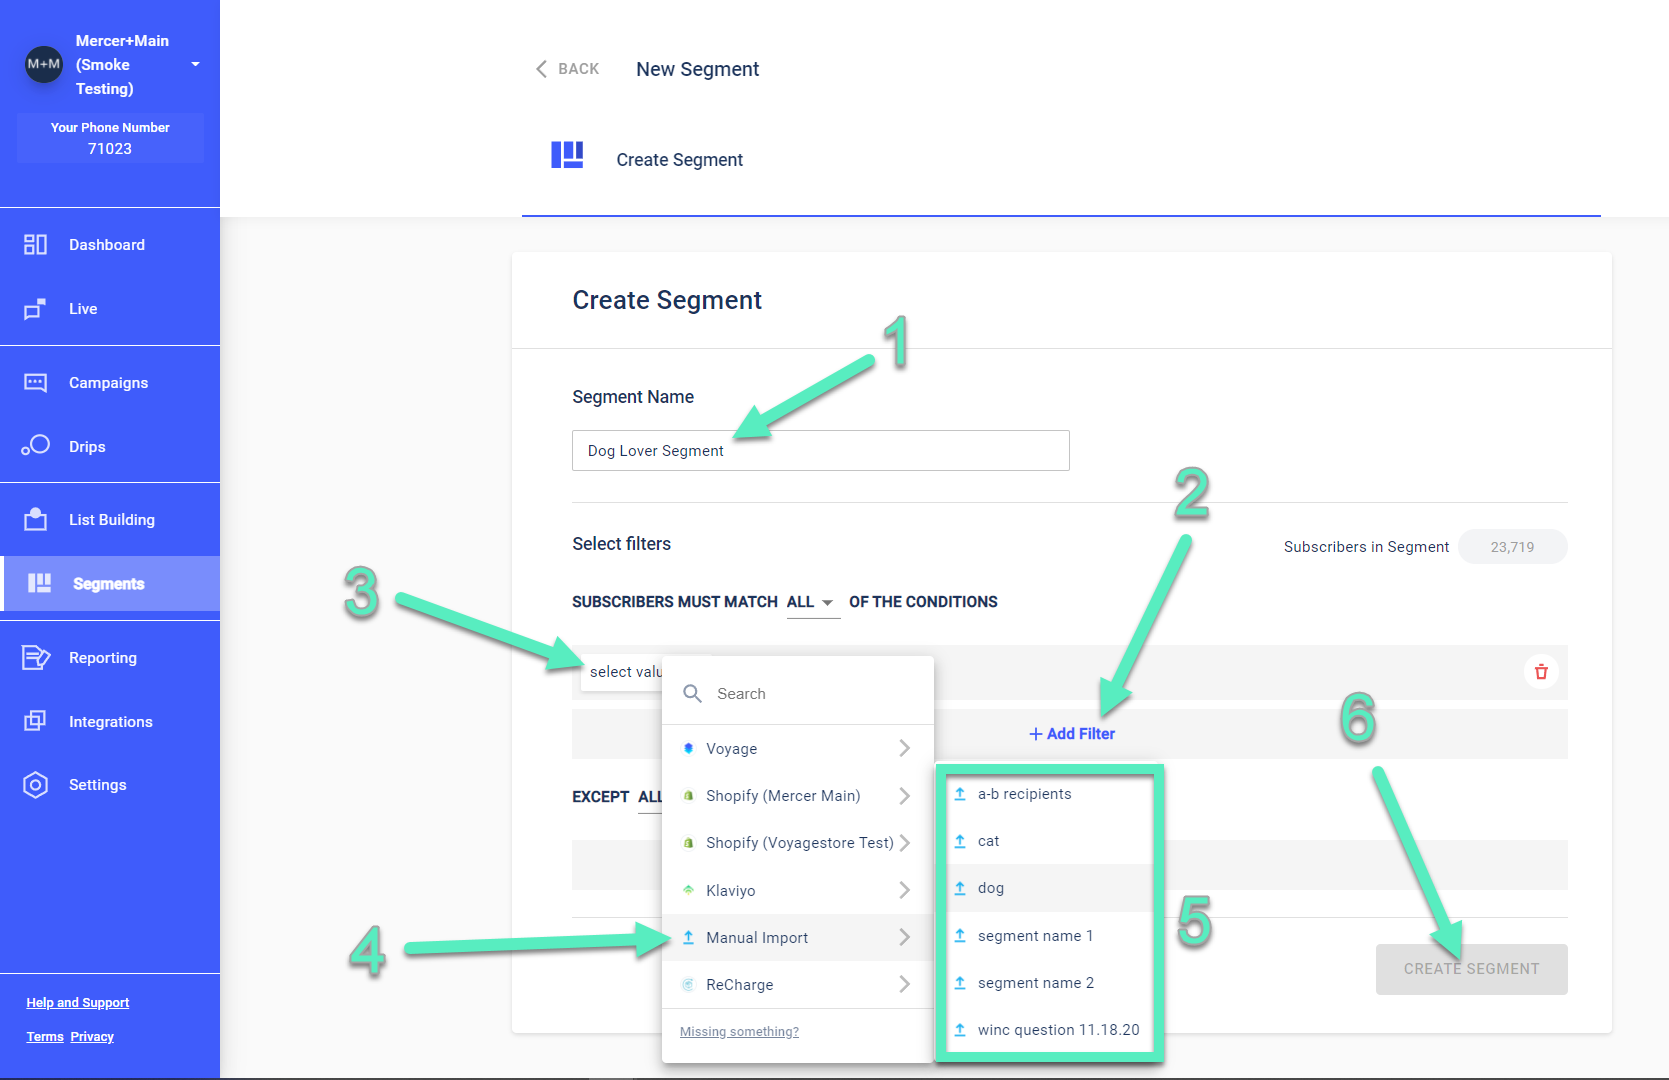
On the Create Segment page, give your new segment an appropriate name [1]. Near the center of the screen, click on Add Filter [2]. A select values drop down menu will appear [3] which you should click. Look for and hover over "Manual Import" [4] on the list of filter sources, and you should see a complete list of all your active, manually uploaded attributes [5]. When done, click Create Segment [6]:
Once saved, the segment can be used when creating and sending one-time campaigns.
If you have any additional questions please contact us at [email protected].