Giving customers the option to subscribe to your SMS messages during checkout is a great idea. Engagement and commitment are high during purchase and customers could be looking for additional channels to stay in touch for support and for other reasons.
Please feel free to contact your Voyage account manager or email us at [email protected] if you need any additional help setting up an opt-in at checkout.
Settings within Shopify
You'll need to have admin permissions within Shopify to perform the following actions. Most of the Shopify changes we discuss in this article will take place inside Shopify's main admin area, under Settings [1] then under Checkout [2]. We'll refer back to this Checkout section frequently:


Compliance Note: With the method we describe in this article, a double opt-in flow is required for compliance purposes.
Collect Phone Numbers at Start of Checkout
You can capture phone numbers at the beginning of the Shopify checkout process. The customers will see this at the very top of their checkout:

When customers enter a phone number (as opposed to an email address), the "Email me with news and offers" checkbox will disappear.
To configure this, go to the Settings > Checkout area of the Shopify admin panel as described above.
Scroll down to the section 'Customer contact method' [1]. Under Select what contact method customers use to check out, select the radio button titled 'Phone number or email' [2]:

Scroll to the very bottom of the page and click on Save.
Opt-in for SMS During Checkout
This will let you show an optin checkbox near the end of the Contact Information checkout form, just before going on to shipping. They'll see this option during checkout:

To configure this, again go to the Settings > Checkout area of the Shopify admin panel as described above.
This time you are looking for a section titled, Consent for marketing [1]. Check the SMS marketing box [2]. You can also collect their email addresses here [3] for marketing purposes. Note for SMS collection you'll also need to fill in the terms of service and privacy policy in Shopify's legal settings [4]:

Again, at the very bottom of the page, click Save to retain your changes.
Tip: Note that both before and after phone number options can be used, and the two fields will interact with each other so your customers only need to enter their phone number once.
Add Disclaimer Copy
It is also possible to modify the disclaimer copy that appears with your opt-in:

Again, on the same Settings > Checkout page of Shopify's admin area as described above, you are looking for a section called Checkout language [1]. Click on the Manage checkout language button [2]:

This page is very large. You can try scrolling to find the Checkout marketing section [1], but it is likely going to be easier to hit CTRL-F in your browser to perform a search operation. Search for the term "accept marketing" [2] to be taken directly to the field we want to modify [3]:

Paste the following message into the Accept marketing checkbox label field, remembering to replace [your name] with your Brand Name:
I agree to receive emails or SMS messages from [your name]. By joining via text messages, I agree to receive recurring marketing messages (e.g. cart abandon) from [your name] at the mobile number used to send the join text message. Msg & data rates may apply. Msg frequency varies. Consent is not a condition of any purchase. STOP to unsubscribe, HELP for help. View our Terms of Service and Privacy Policy for details.
Then scroll all the way to the top of the page (or hit CTRL-HOME), and click on Save in the top right corner.
Collect Phone Numbers Under Shipping Address
Another natural location to request a phone number is under the shipping details at the bottom of your checkout page, such as:

Go back to the Shopify Settings > Checkout section as described above, and this time scroll down until you see Form options [1]. Under Shipping address phone number [2] make your selection of either Optional [3] (recommended) or Required [4]:

Remember to scroll to the very bottom of the page and click Save.
Disclaimer on Phone Tool Tip
This tool-tip can also be modified to suit your specific branding and compliance standards:

In the Shopify Settings > Checkout section as described above, scroll down to Checkout language [1] and click on the Manage checkout language button [2]:

Scroll down to Phone tooltip [1], or in your browser perform a CTRL-F search for "phone tooltip" [2] to quickly find the field we want to edit [3]:

Copy and paste the following text (or something similar) making sure to replace [your name] with your Brand Name:
By joining via text messages, I agree to receive recurring marketing messages (e.g. cart abandon) from [your name] at the mobile number used to send the join text message. Msg & data rates may apply. Msg frequency varies. Consent is not a condition of purchase. STOP to unsubscribe, HELP for help. View our Terms of Service and Privacy Policy for details.
Then scroll all the way to the top of the page (or hit CTRL-HOME), and click on Save in the top right corner.
Adding Code to Checkout Page for Opt-in
You'll need to add code to your checkout page to enable the Opt-in at Checkout SMS messages to be sent to your customers.
Note: The below code snippet includes both modal display and purchase tracking.
Go to Shopify's Admin page and click Settings > Checkout as shown earlier. Scroll down to the Additional Scripts heading [1] to find the Order status page field we're going to modify [2]:

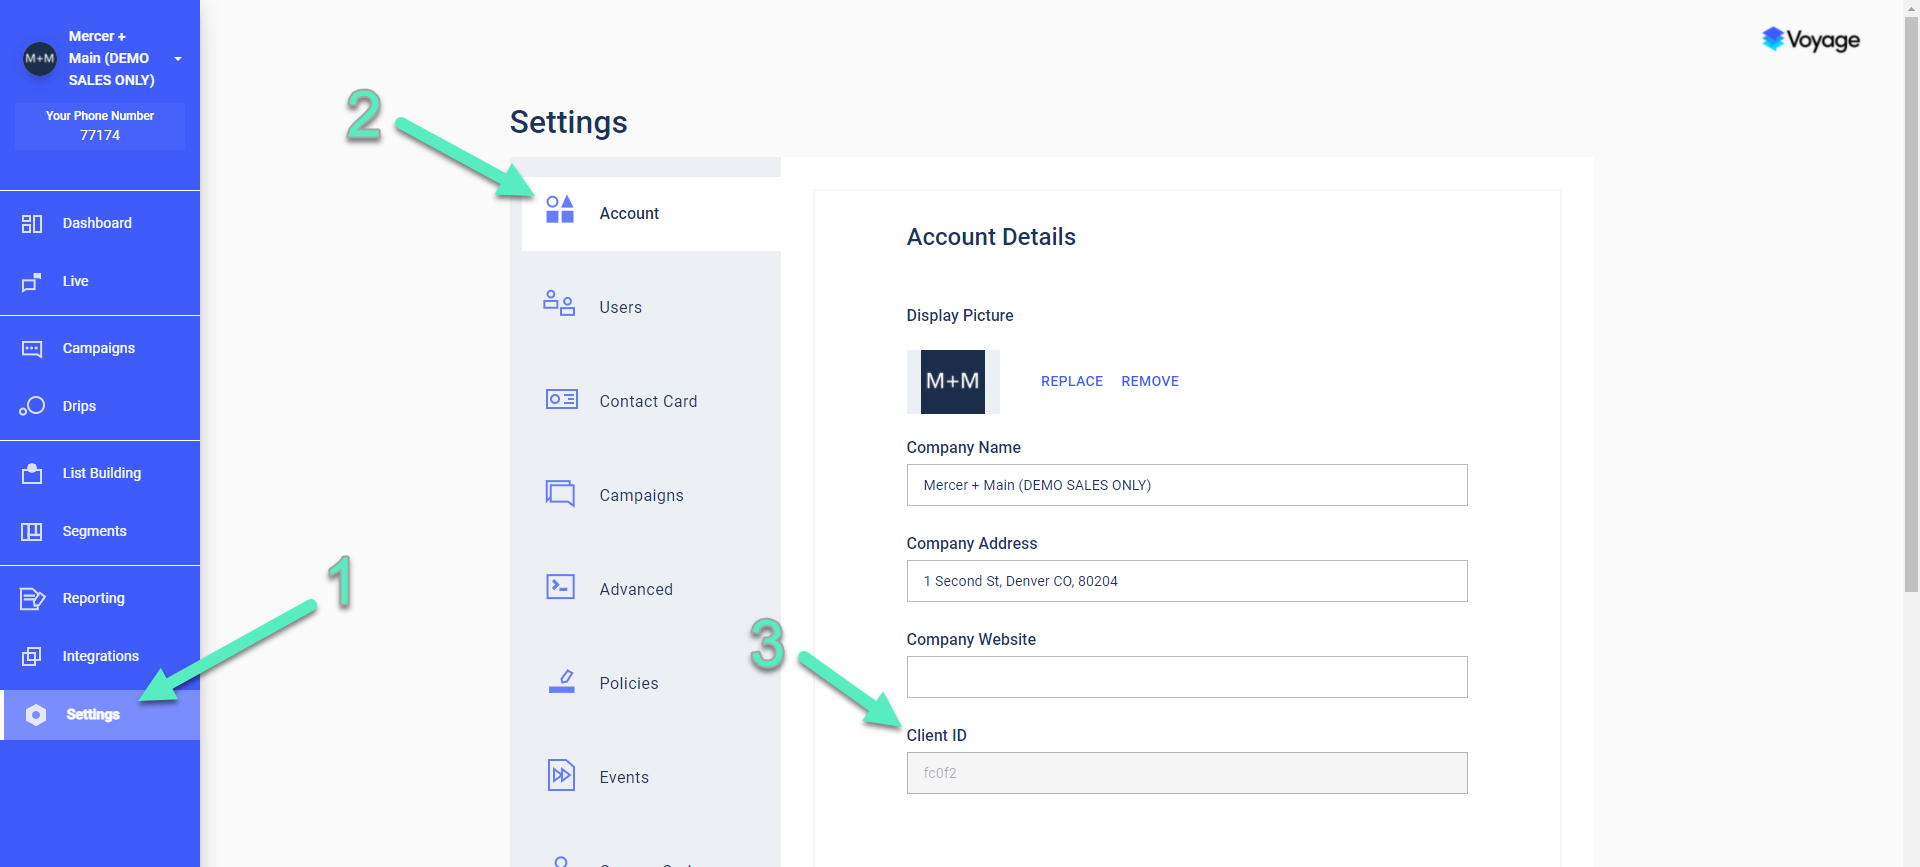
You'll need your own Voyage Client ID, which you can find in the Voyage web app's Settings page [1]. Under the Account subheading [2] scroll down to the Client ID field [3]:
Replace 'Client ID' in the code below with your own Voyage Client ID (ex: 'f123456789'), then copy and paste it into the Order status page field shown above. Remove/replace any existing code as you do so:
{% raw %}
{% if first_time_accessed %}
<script async src="https://assets.voyagetext.com/voyage.production.js"></script>
<script type="text/javascript">
/* <![CDATA[ */
(function(){if(window.voyage)return;window.voyage={q:[]};var fns=['init','event','track'];
for(var i=0;i<fns.length;i++){(function(fn){window.voyage[fn]=function(){
this.q.push([fn,arguments]);}})(fns[i])}})();voyage.init('Client ID', { popup: true });
/* ]]> */
</script>
<script type="text/javascript">
voyage.track('Purchase', { amountCents: {{ order.total_price }}, orderId: {{ order.order_number }} });
{% if order.customer.accepts_marketing == true %}
const marketingPhone = '{{ order.customer.phone}}' || '{{shipping_address.phone }}' || '{{billing_address.phone }}';
marketingPhone && marketingPhone.length > 9 && voyage.track('MarketingPhone', { marketingPhone });
{% endif %}
</script>
{% endif %}
{% endraw %}
Scroll to the bottom of the Shopify Checkout settings page and click Save. There is one final step; setting up the list building campaign in the dashboard.
Voyage Opt-in at Checkout Campaign
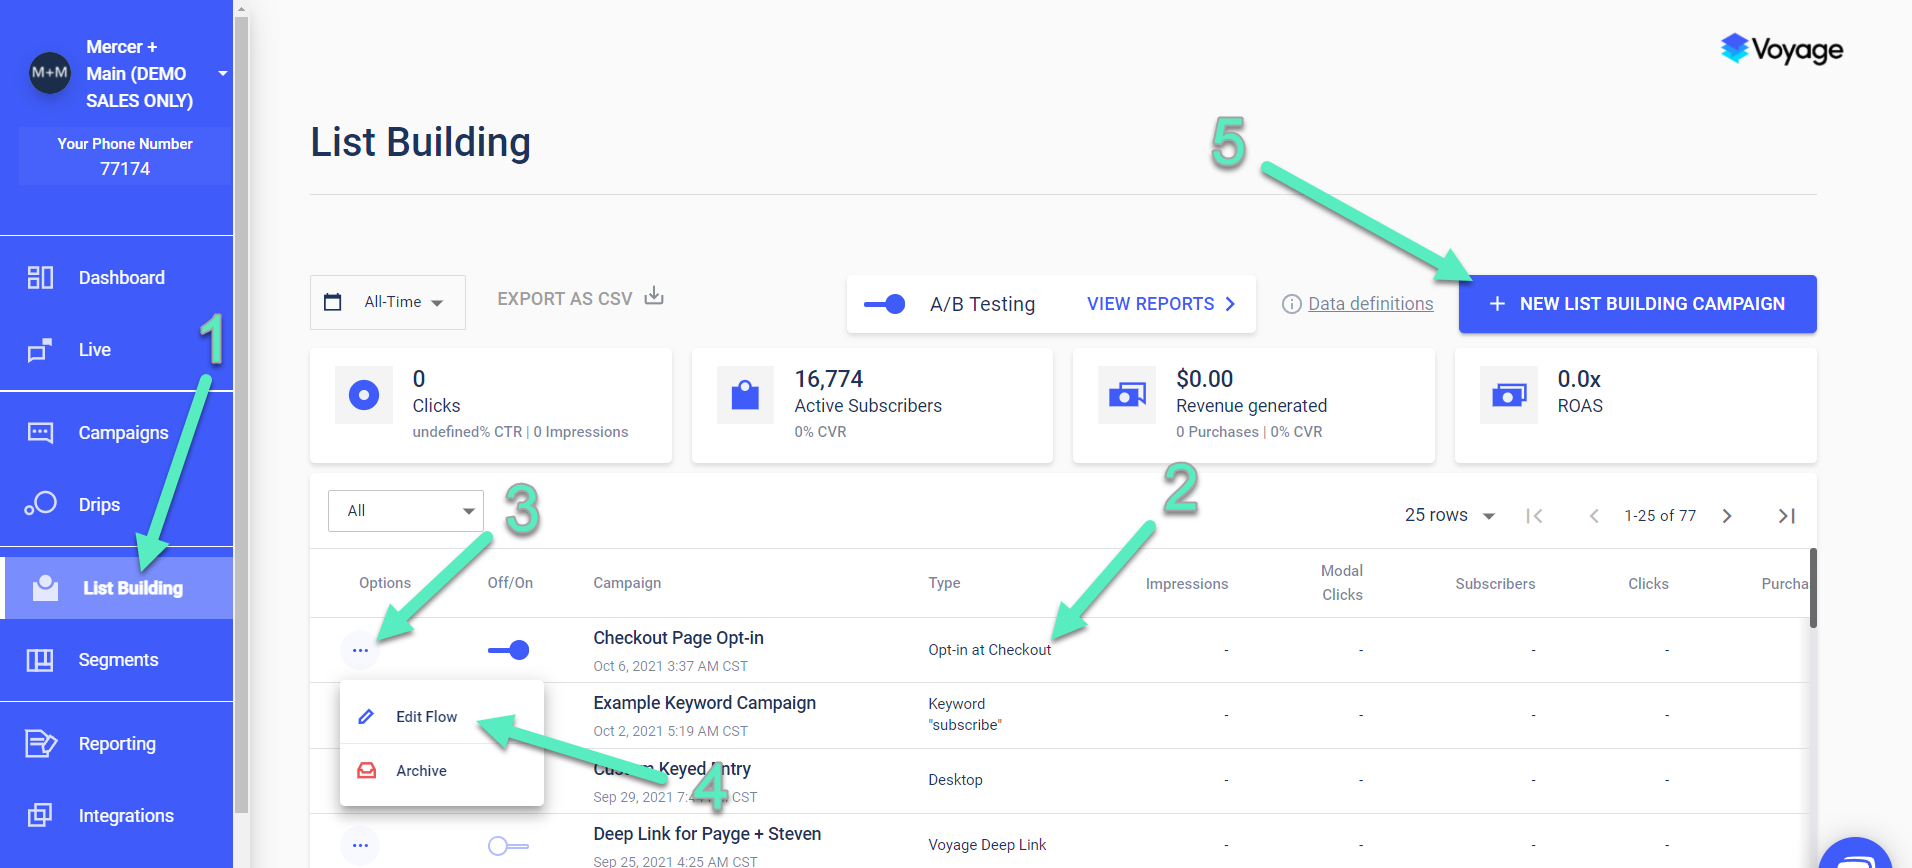
In the Voyage web app, click List Building [1] on the left to be taken to a list of existing list building campaigns. Double check to see if an Opt-in at Checkout campaign already exists [2]. If it does, you won't be able to create a new one as only one such campaign is allowed in Voyage at a time. If that is the case, you can instead edit the flow by clicking on the three dots [3] and selecting Edit Flow [4]. Otherwise, to create a new campaign click New List Building Campaign [5] in the top right:
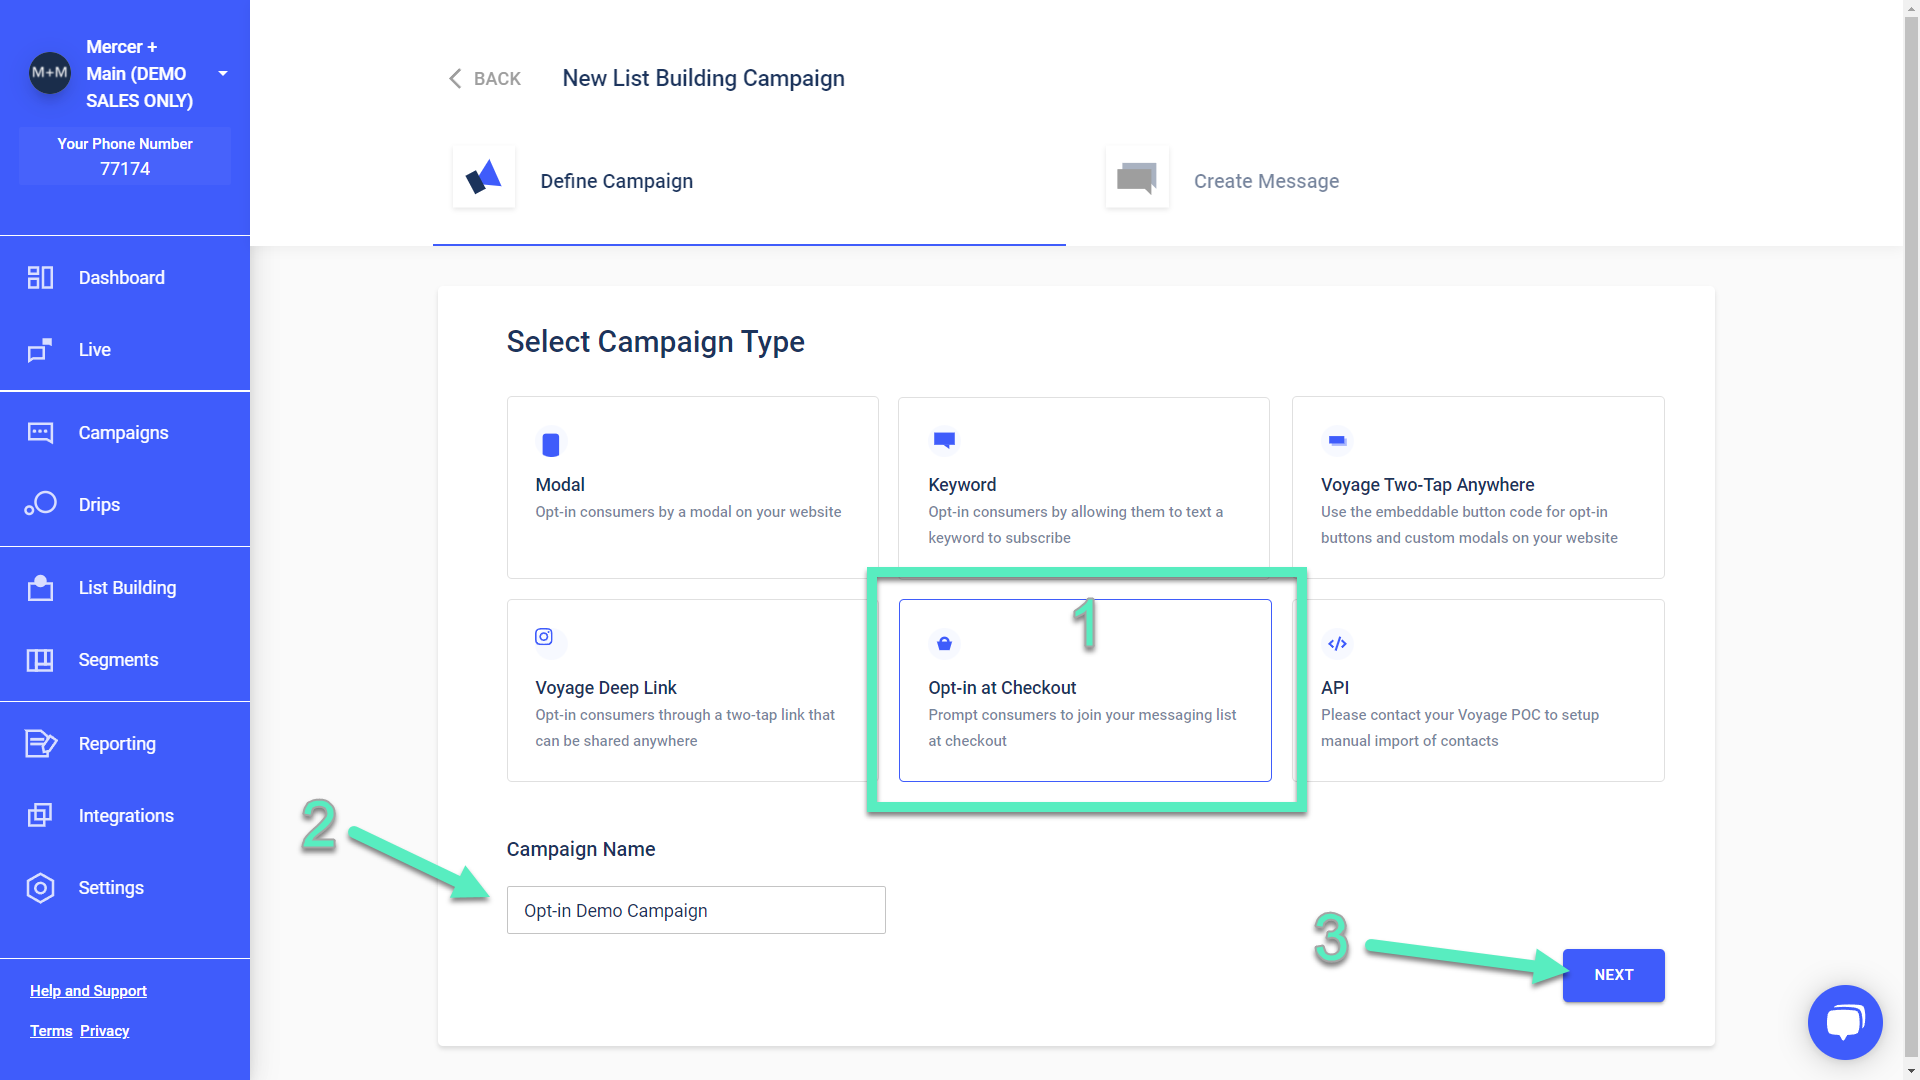
Next select Opt-in at Checkout [1], give your campaign a name [2], then click Next [3]:
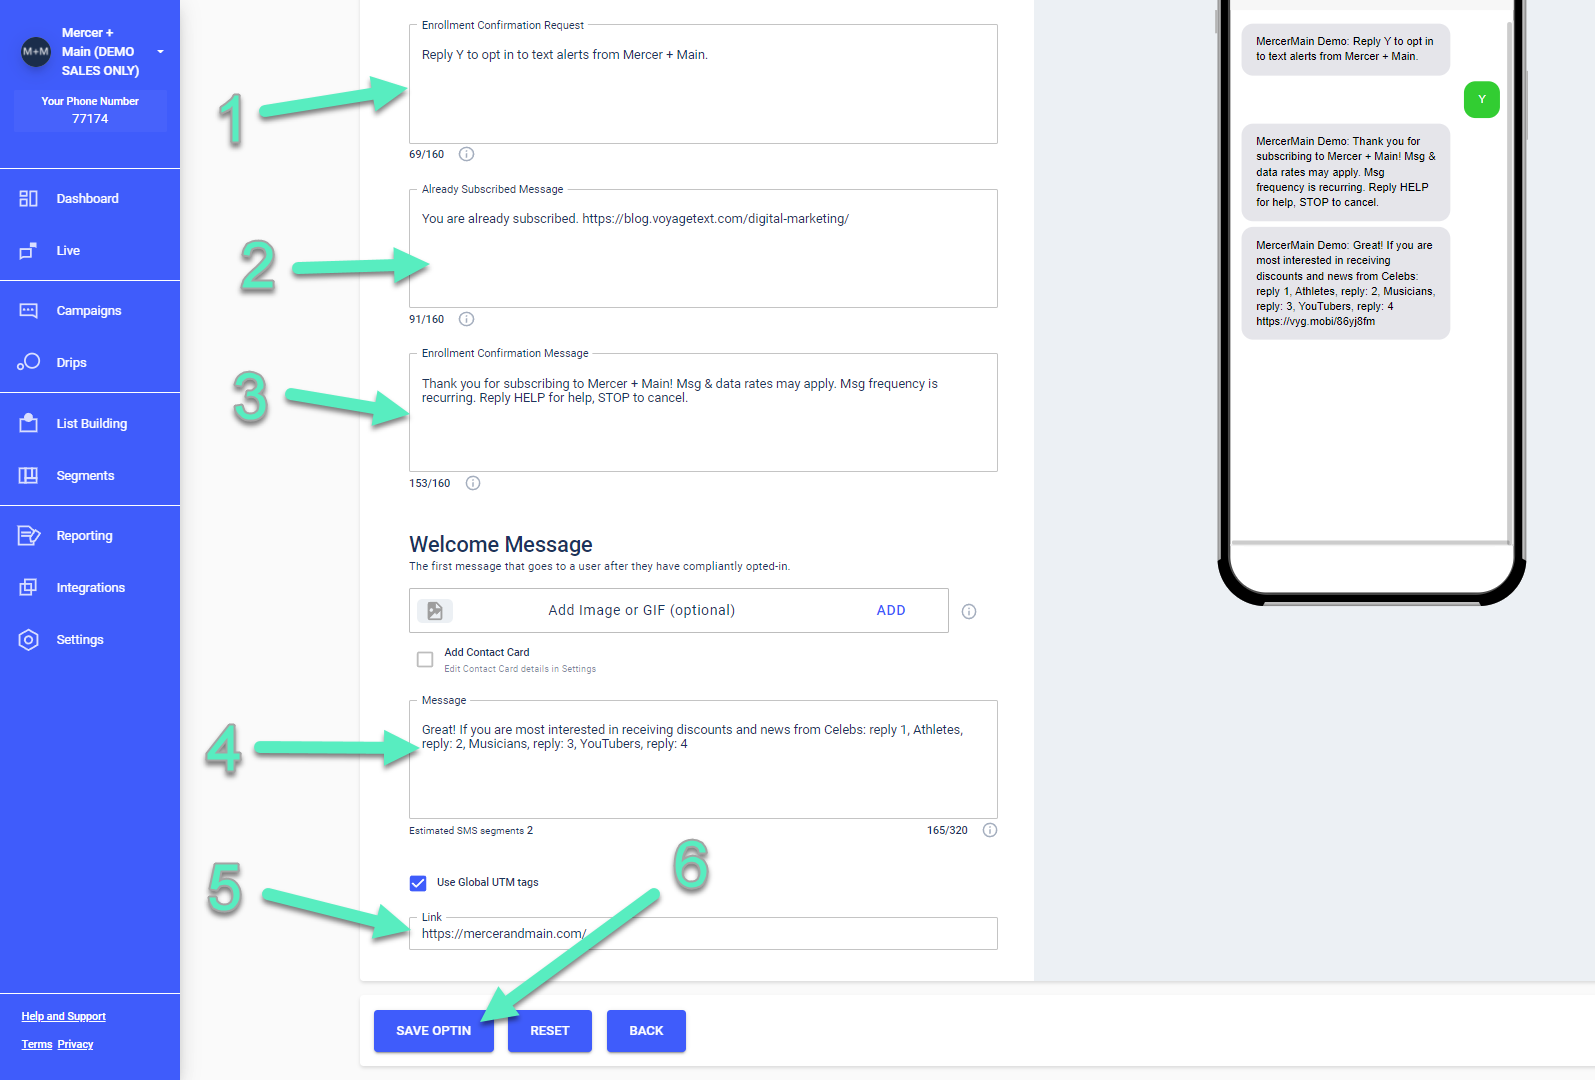
On the Checkout Page Opt-in flow page, edit the Enrollment Confirmation Request [1], Already Subscribed Message [2], and Enrollment Confirmation Message [3] as needed. Pay special attention to the Welcome Message [4] and the welcome Link [5] to ensure customers take the desired action(s). When done, click on Save Opt-in [6]:
If you have any additional questions please contact us at [email protected].