Modals are the primary method to opt-in customers. It's your best path to a robust, ever-growing list of engaged subscribers. Modals (also called pop-ups) sit right below the acquisition layer of your customer funnel. They are a big part of converting mobile visitors into subscribers, customers and eventually repeat buyers.
Modal Navigation Overview
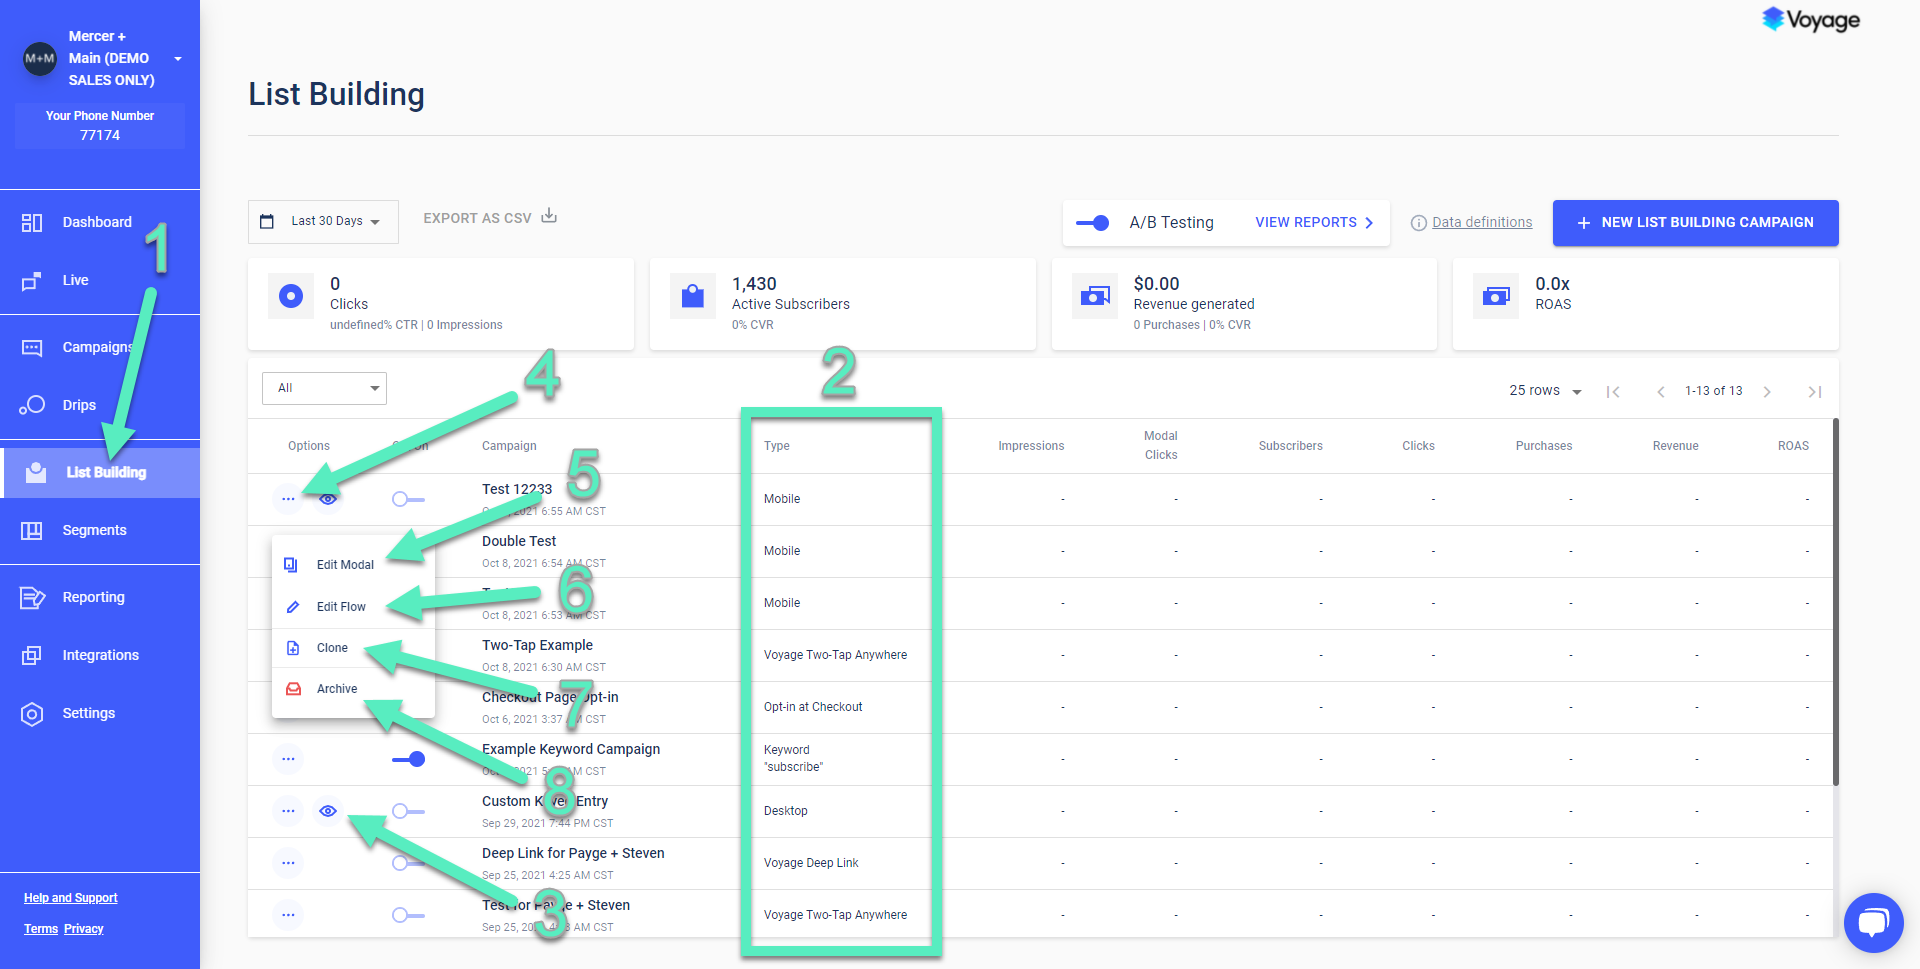
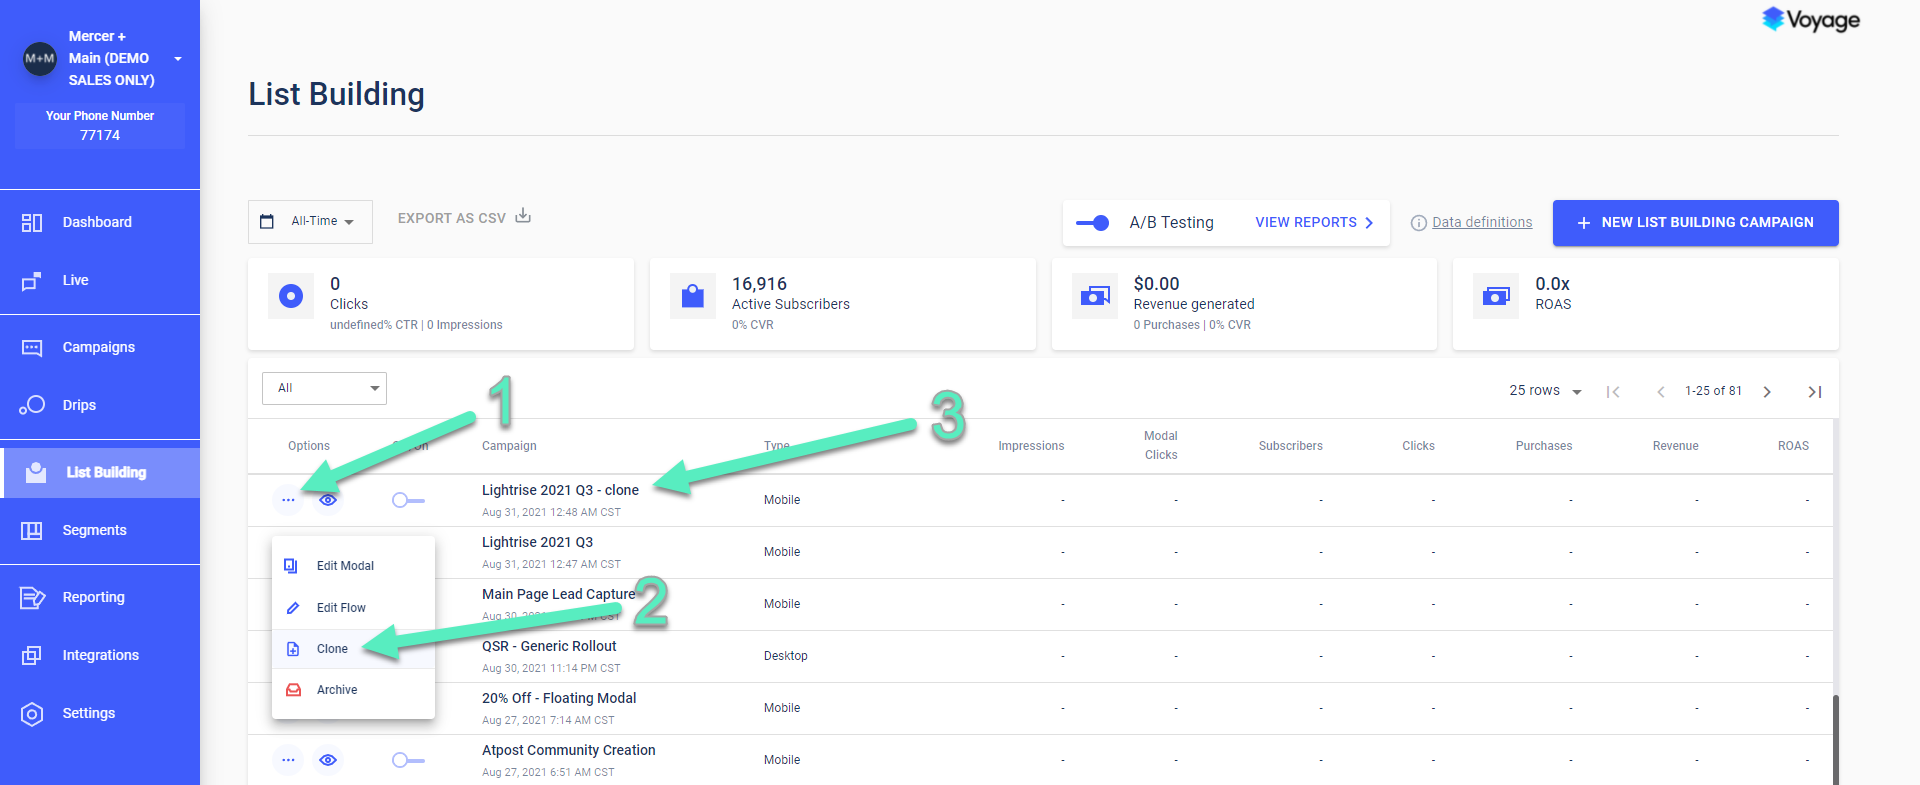
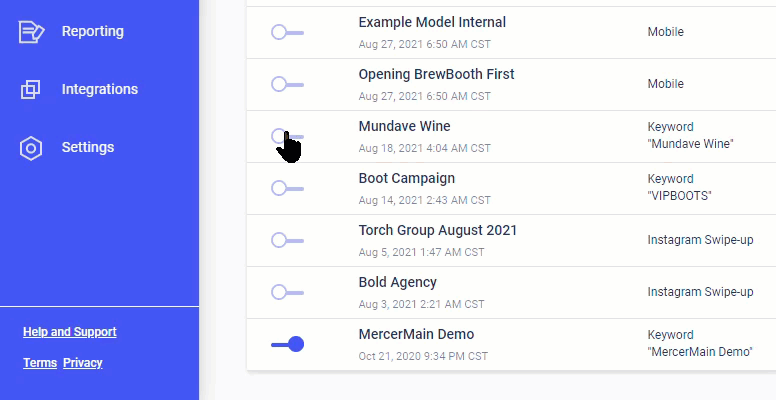
Modals are managed within the List Building section of Voyage. From the main menu, click on List Building [1]. From here you will see a list of all of your list building campaigns, and all modals will be designated as Mobile or Desktop under the Type column [2]. Here is where you can click on the eye icon [3] to see a contextual preview or click on the ellipses [4] to expose the Edit Modal [5], Edit Flow [6], Clone [7], or Archive [8] options:
Modal Setup Options
There are four primary ways to set up your very first modal:
Designed by Voyage. Request a fully custom, on-brand modal design from Voyage. Our typical turnaround time is 3-7 business days.
Your Own Custom. Use your own custom-designed modal by starting with our baseline HTML template. Covers mobile full, mobile floating, mobile bottom or desktop type modals.
Voyage Dual-Tap Anywhere. Build your own mobile modal with Voyage’s embedded button code. See Voyage Dual-Tap Anywhere for full implementation instructions.
Custom Keyed Entry. Build your own desktop modal with Voyage’s custom keyed entry. Refer to our Custom keyed entry article for more instructions.
Note: if using a Voyage-developed modal, typically your Voyage account manager will take care of the full list building campaign setup on your dashboard. However, you will still need to install the Voyage global tag for the modal to display correctly. Also, if using options 3 or 4 above, note that your control settings and modal statistics (including Impressions and Clicks) will not be adjustable or displayed inside the Voyage app.
Creating Your Voyage Modal
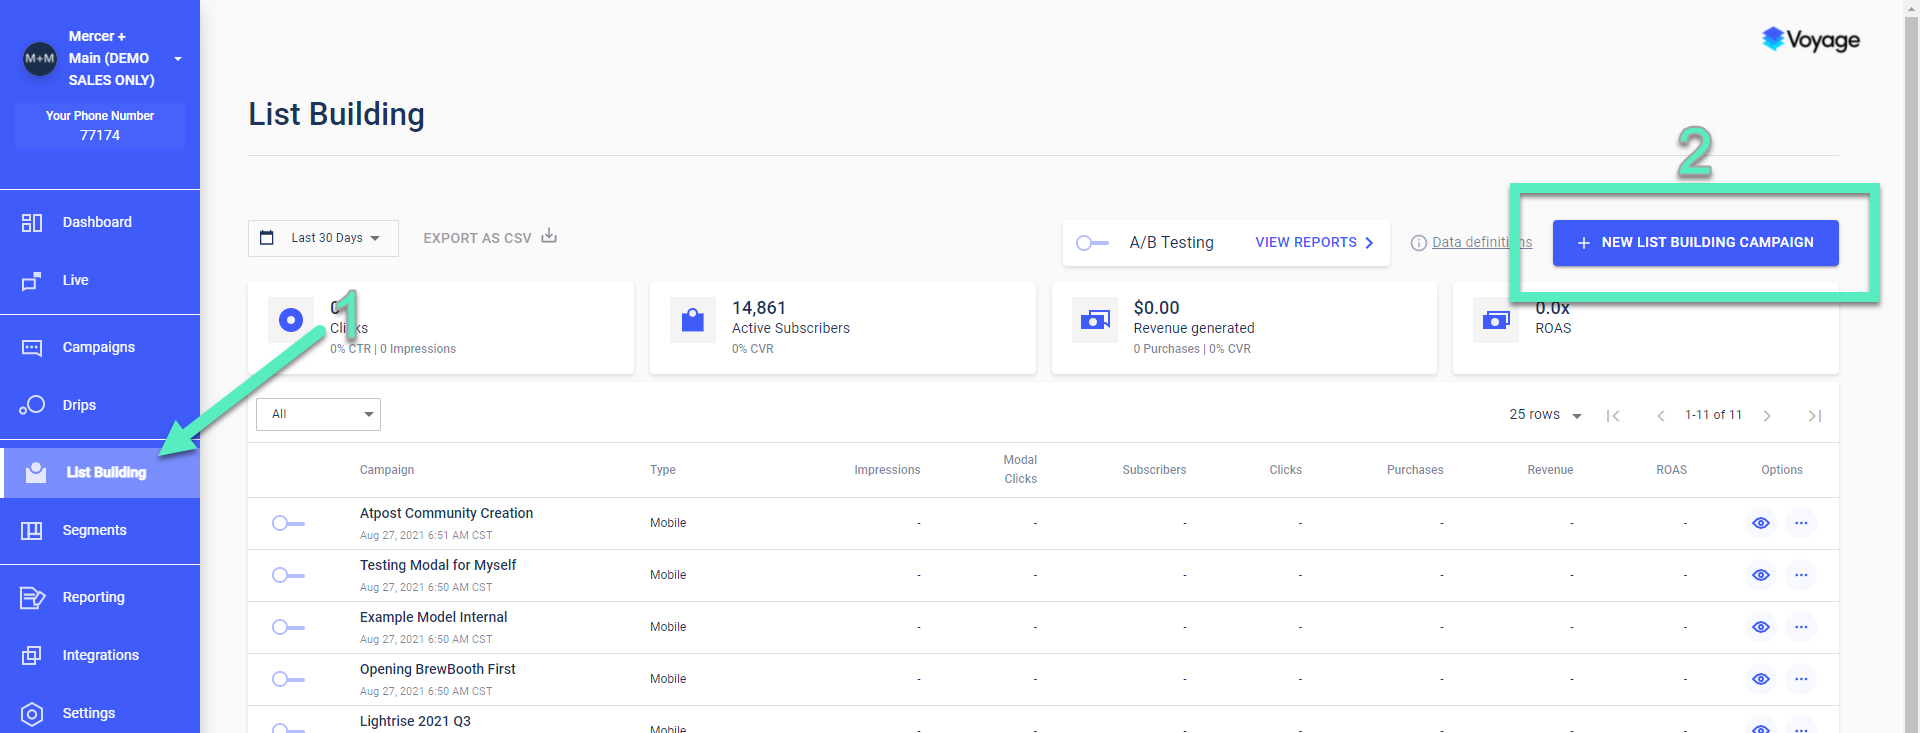
Ensure you have followed all steps to install the Voyage Global Tag in the header of your website before continuing. Navigate to the List Building tab on the left main sidebar [1]. On the main List Building overview page click the blue + New List Building Campaign button [2]:
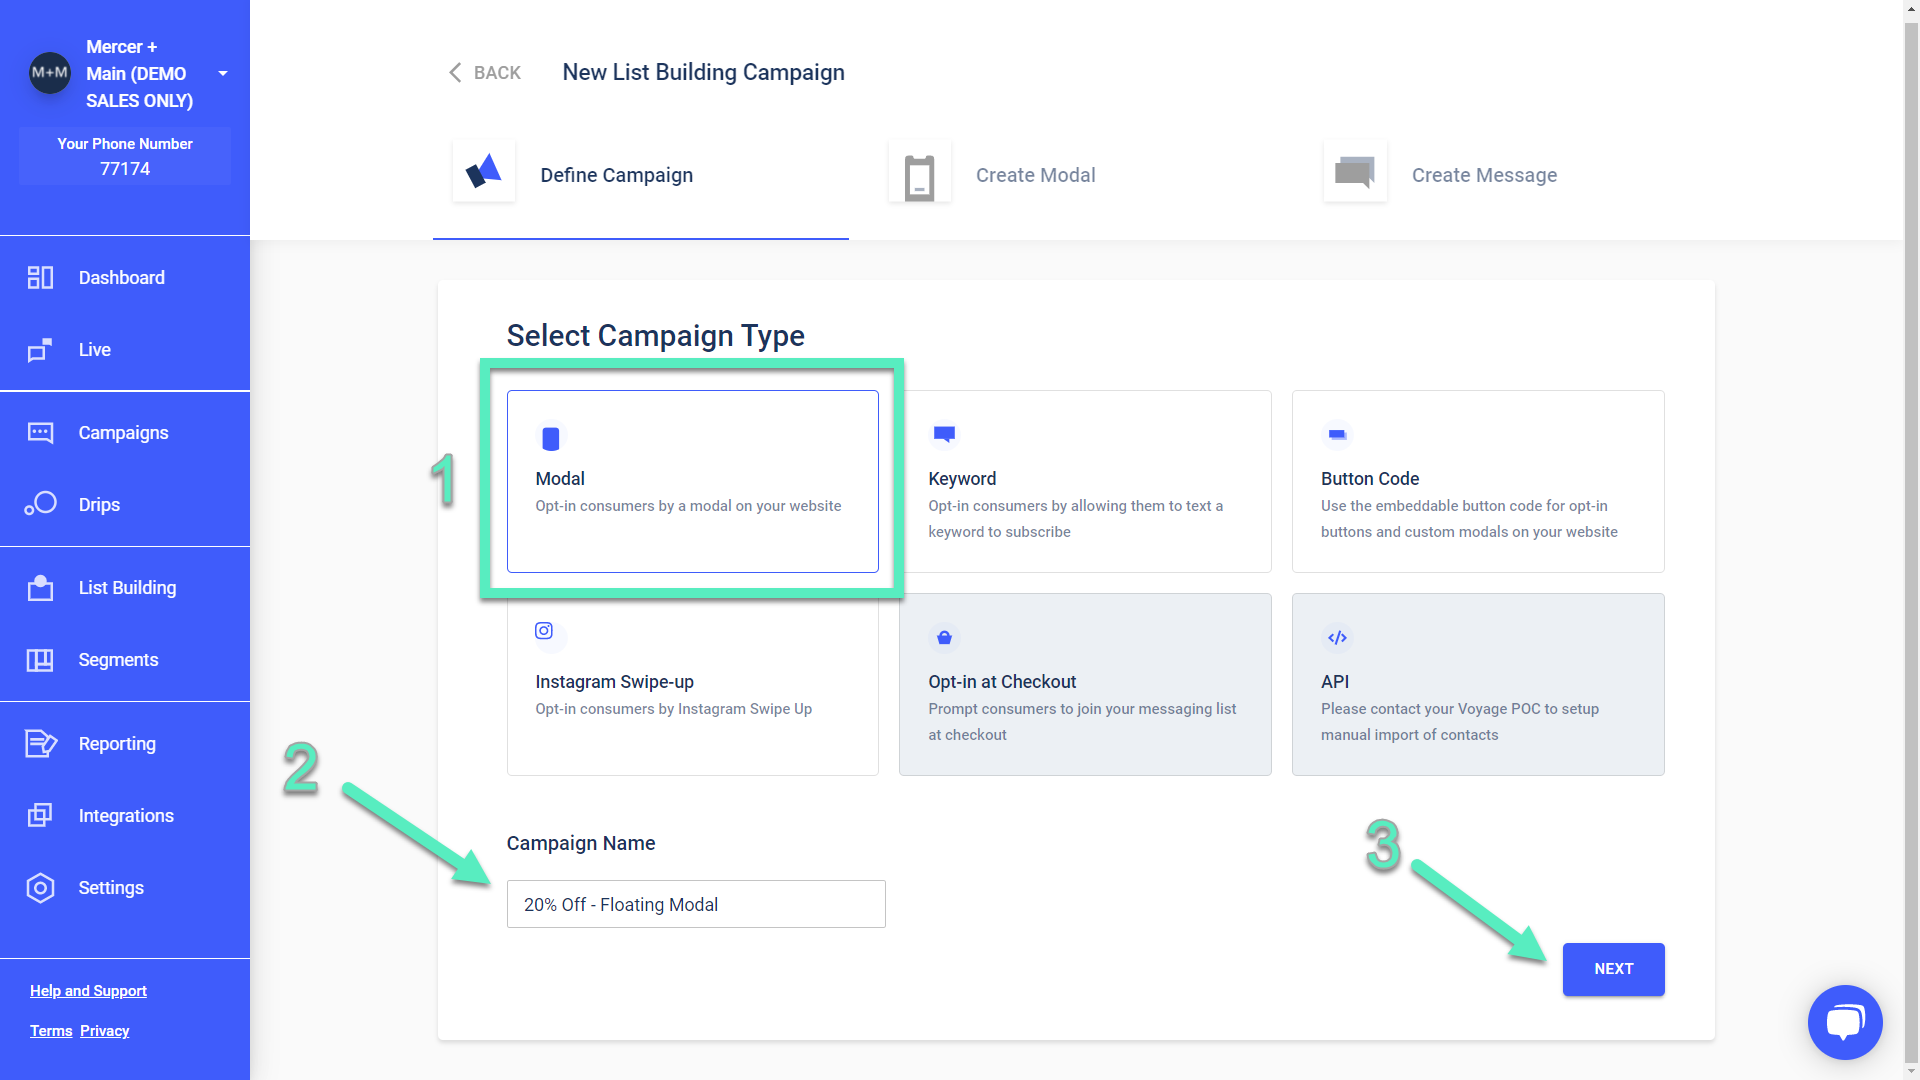
Then select ‘Modal’ as the campaign type [1], give your campaign a name [2] (e.g., "2021 - October - 20% Off - Floating Modal") and then click Next [3]:
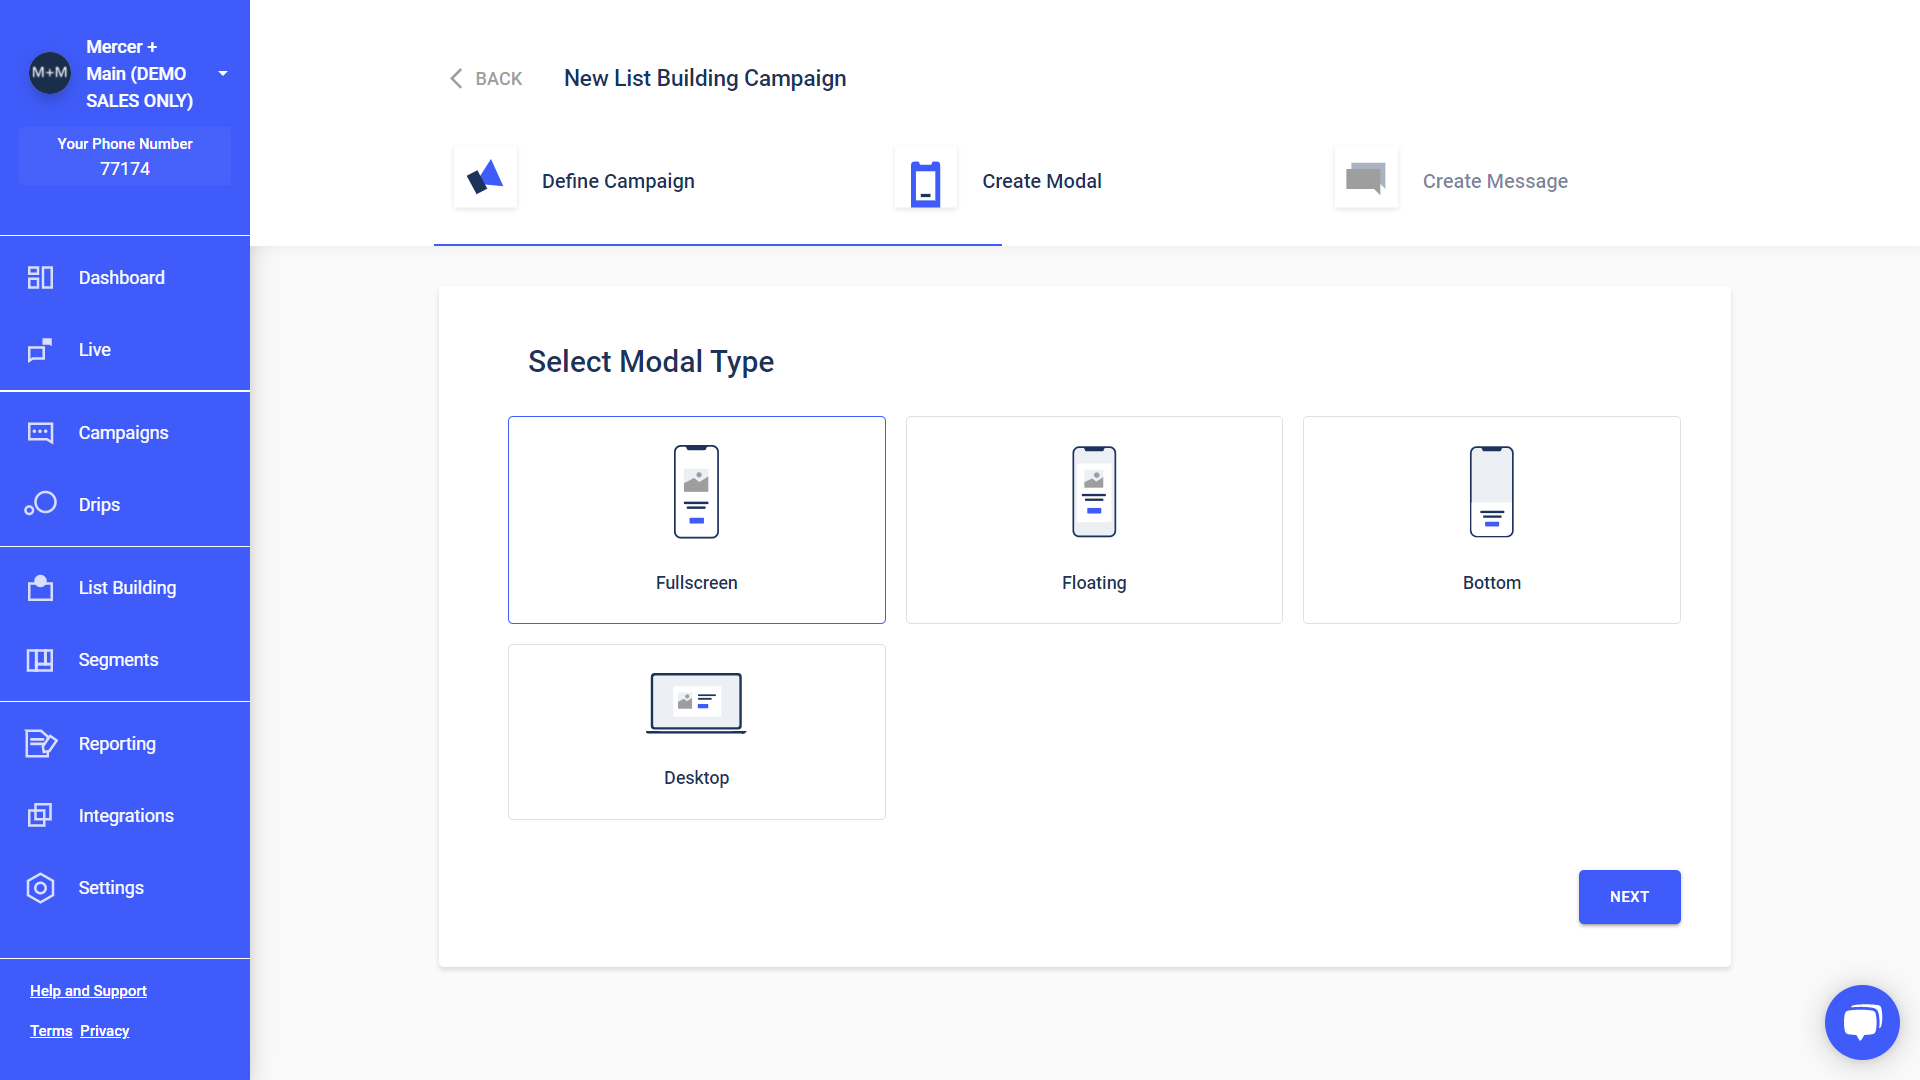
Selecting a modal type on this screen will determine the preview format on the following screens and also alter the downloadable HTML source code template. You cannot change this selection after it has been made. Click Next to continue to editing the modal design:
Downloadable template is not available for Desktop modals at this time. If you are wanting a template to design your own Desktop modal please contact our service team at [email protected].
Edit Source Code in Voyage
The next page will have two tabs, Design [1] and Settings [2] next to a preview of your chosen format [3]. Below the Design tab you will see the Edit Source Code option [4]:

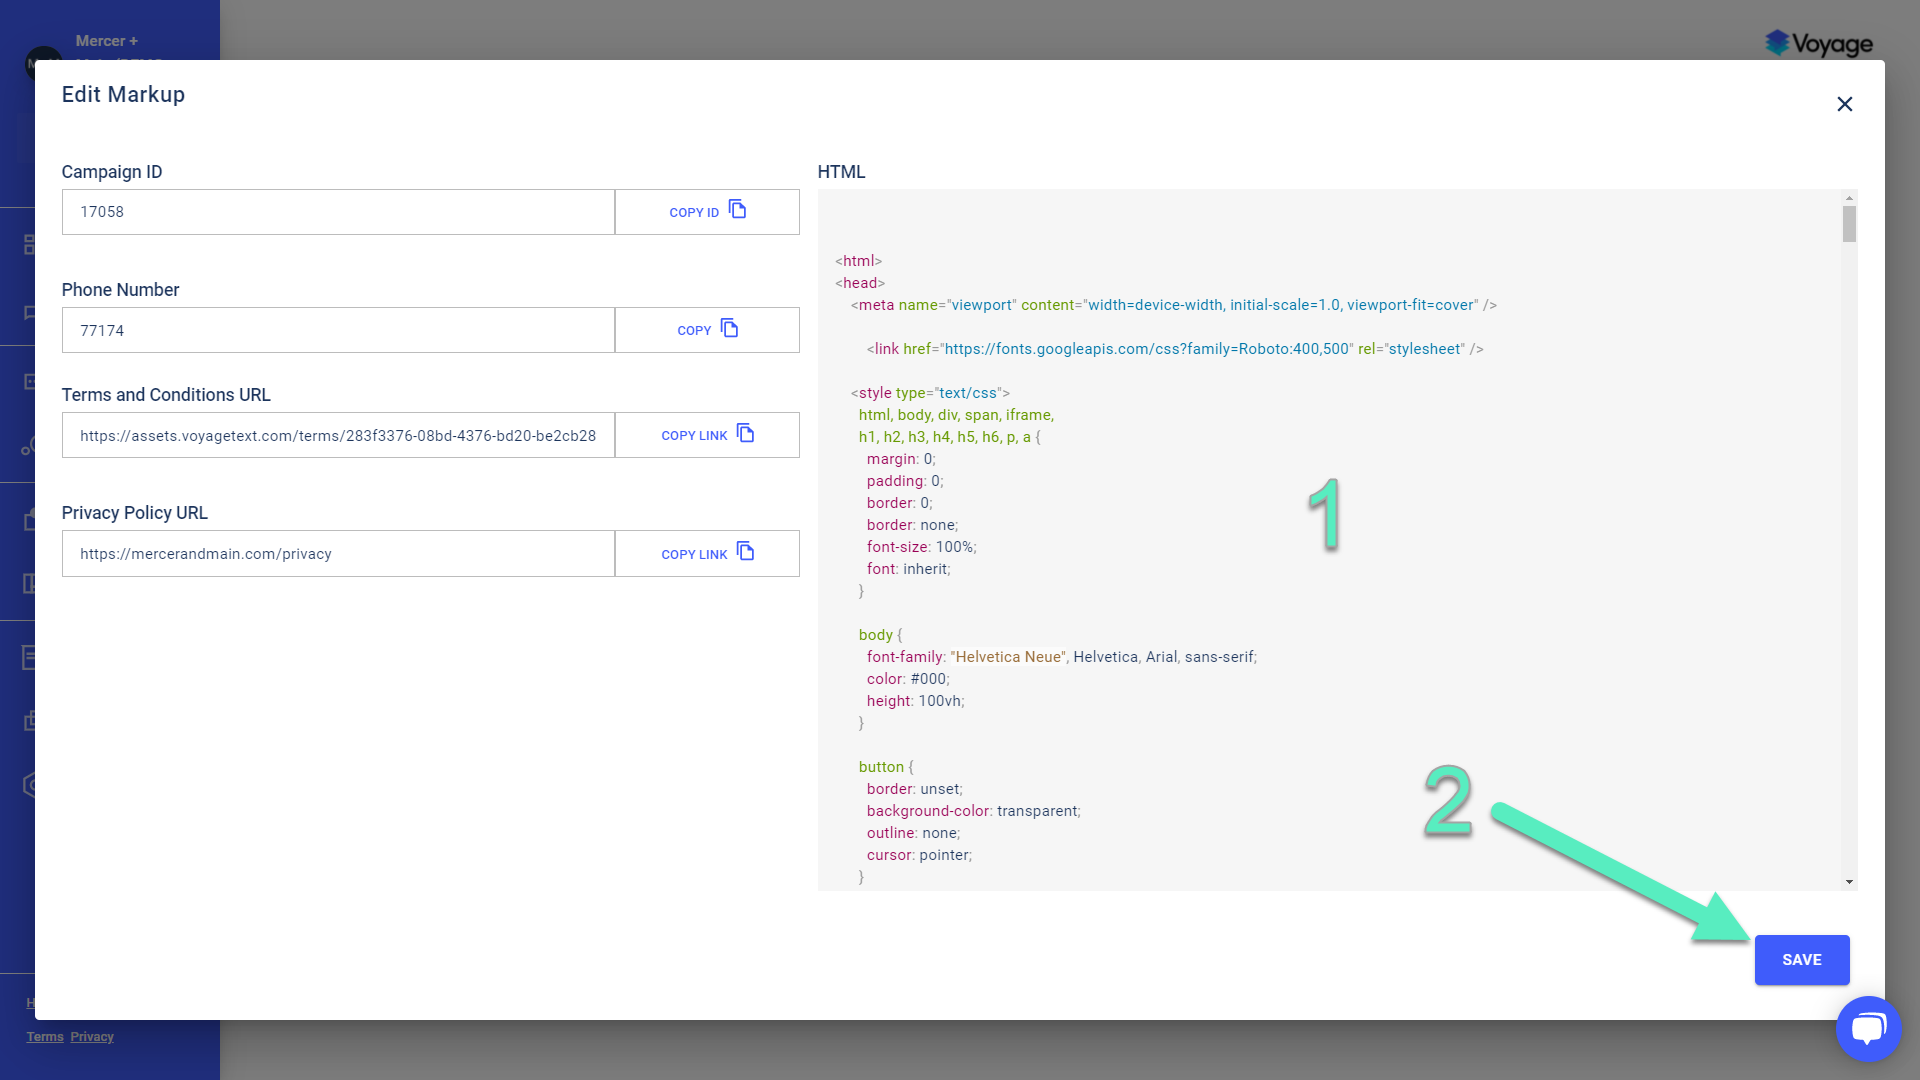
Clicking on this will bring up four self-explanatory fields, Campaign ID, Phone Number, Terms and Conditions URL, and Privacy Policy URL. Make sure these values match what's in the code. On the right you will have access to the raw HTML code for your current modal [1]. You can use this to make quick edits to any of these elements for your modal. When you are done, click Save to retain your changes [2]:
Make sure the values for phone number and Campaign ID match in the code, otherwise, the appropriate stats won't be attributed to the campaign.
When you are done editing the code, you may need to click on the Refresh / Preview button to see the updates. If your selected modal type is desktop, then the Refresh button will show a Preview instead and you will see your modal full screen in your own desktop browser:
When making changes to the code of your modal, you need to "Save" them in the code editor, then "Save" them again on the modal before they will be fully reflected.
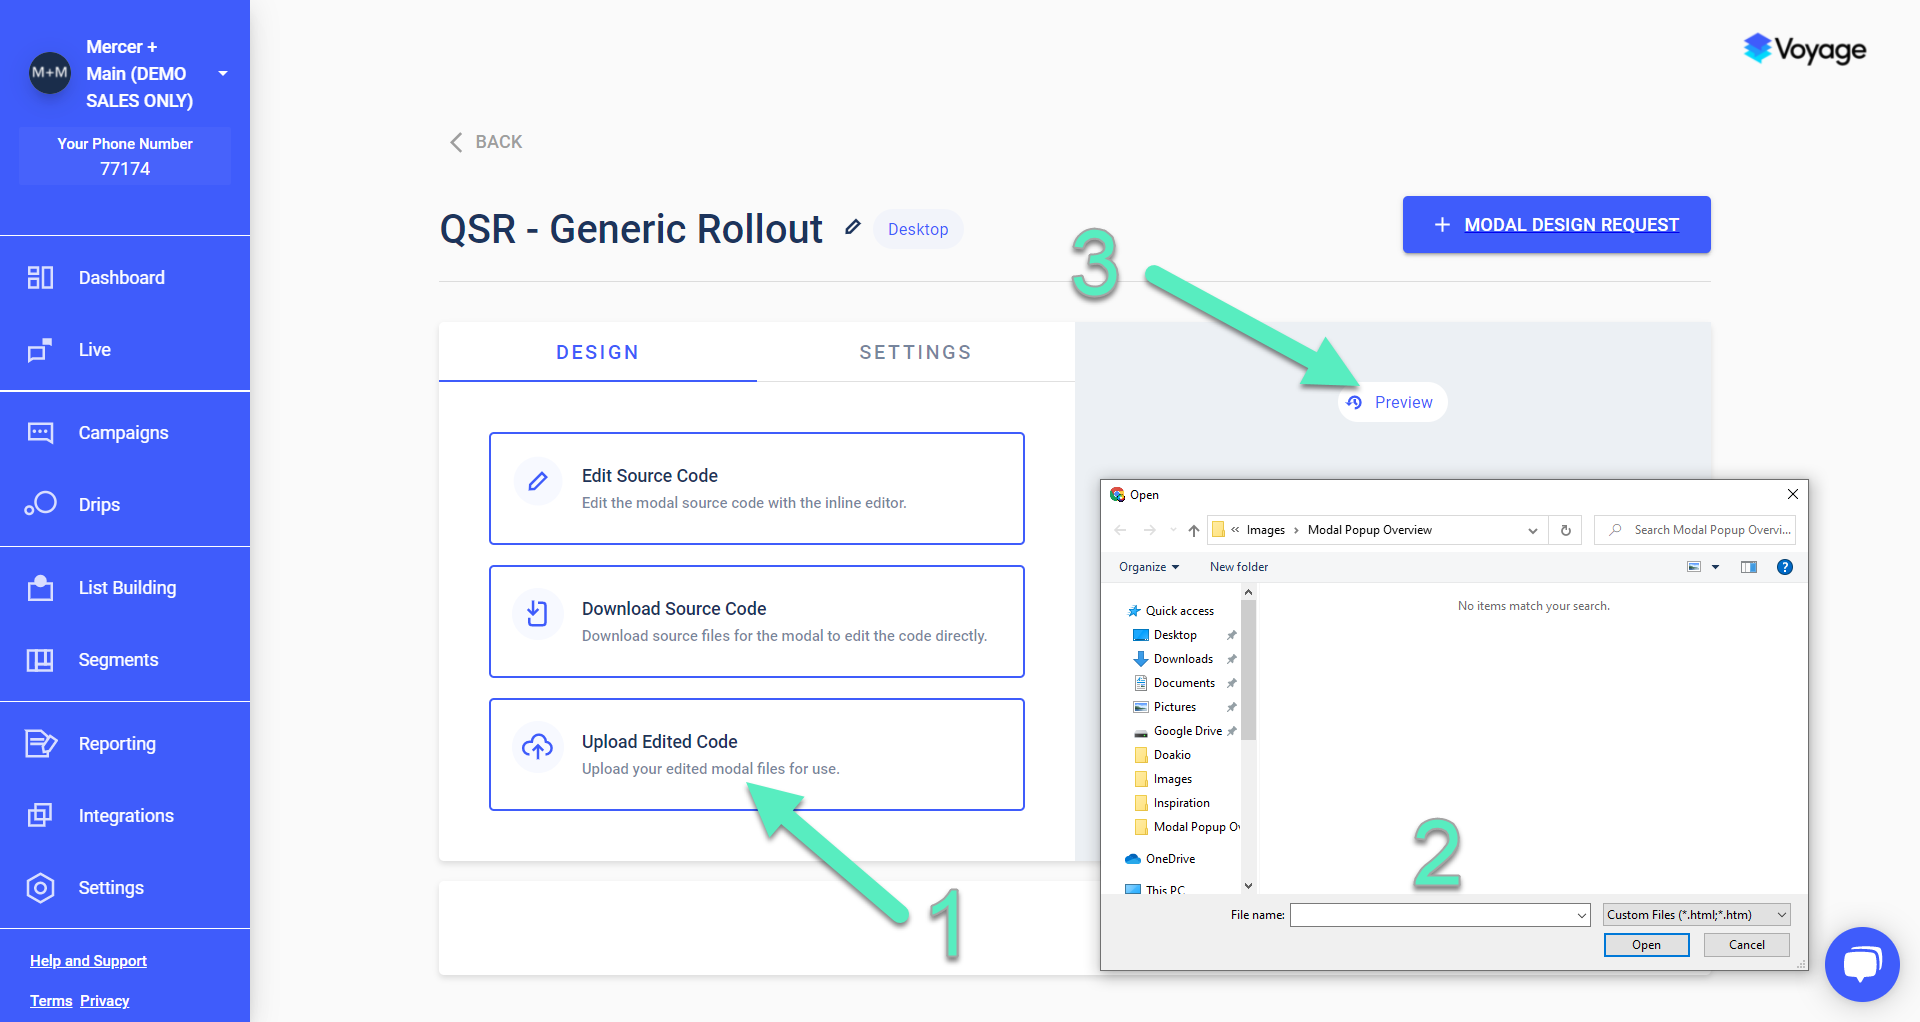
Download Source Code
Following the instructions provided so far will get you to the point where you can Download Source Code for the modal. You will be able to use an HTML editor of your choice to customize it to your heart's content:
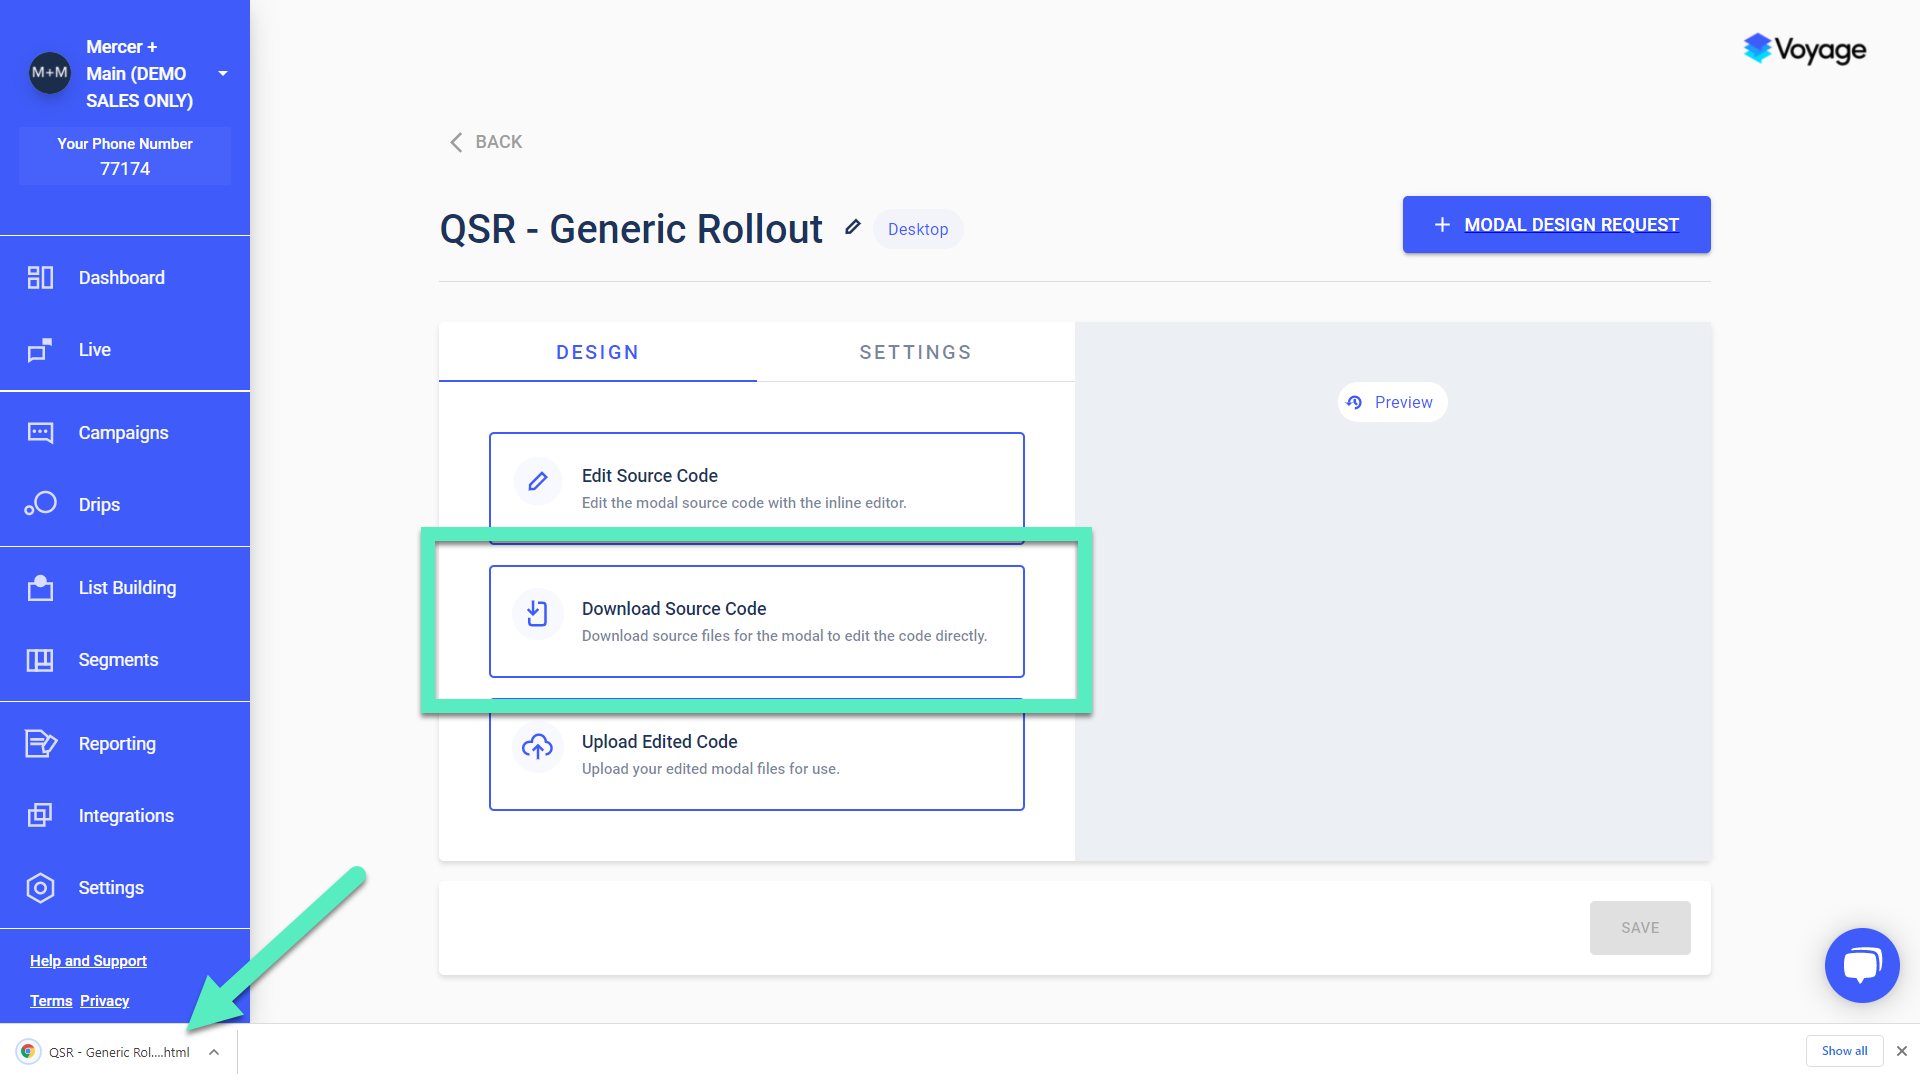
Upload Edited Code
Once you've made your changes to the modal source code, or if you've received fully designed files from Voyage, you'll want to upload them into the system. Simply click on Upload Edited Code here [1] after following the navigation instructions above. Navigate to your custom file [2], and the preview [3] will reflect your new code:
Modal Settings
There are a number of additional settings that give you ever greater control over your customer's popup experience. On the same page where you saw the Design options, you'll see a Settings tab.
You can delay the modal's appearance here [1], where the default is zero seconds (immediate display). The 'Hide for' option [2] shows the modal once, then hides it for a specified number of days before displaying it again. Default is to never show it again.
The 'Number of Page Views' value [3] hides your modal until the visitor has clicked a number of times to other pages on your site. You can also auto-close the modal here [4] or make the modal close a certain amount of time after the user submits their info here [5]. And finally, it is possible to show the modal only a percentage of the time [6]:
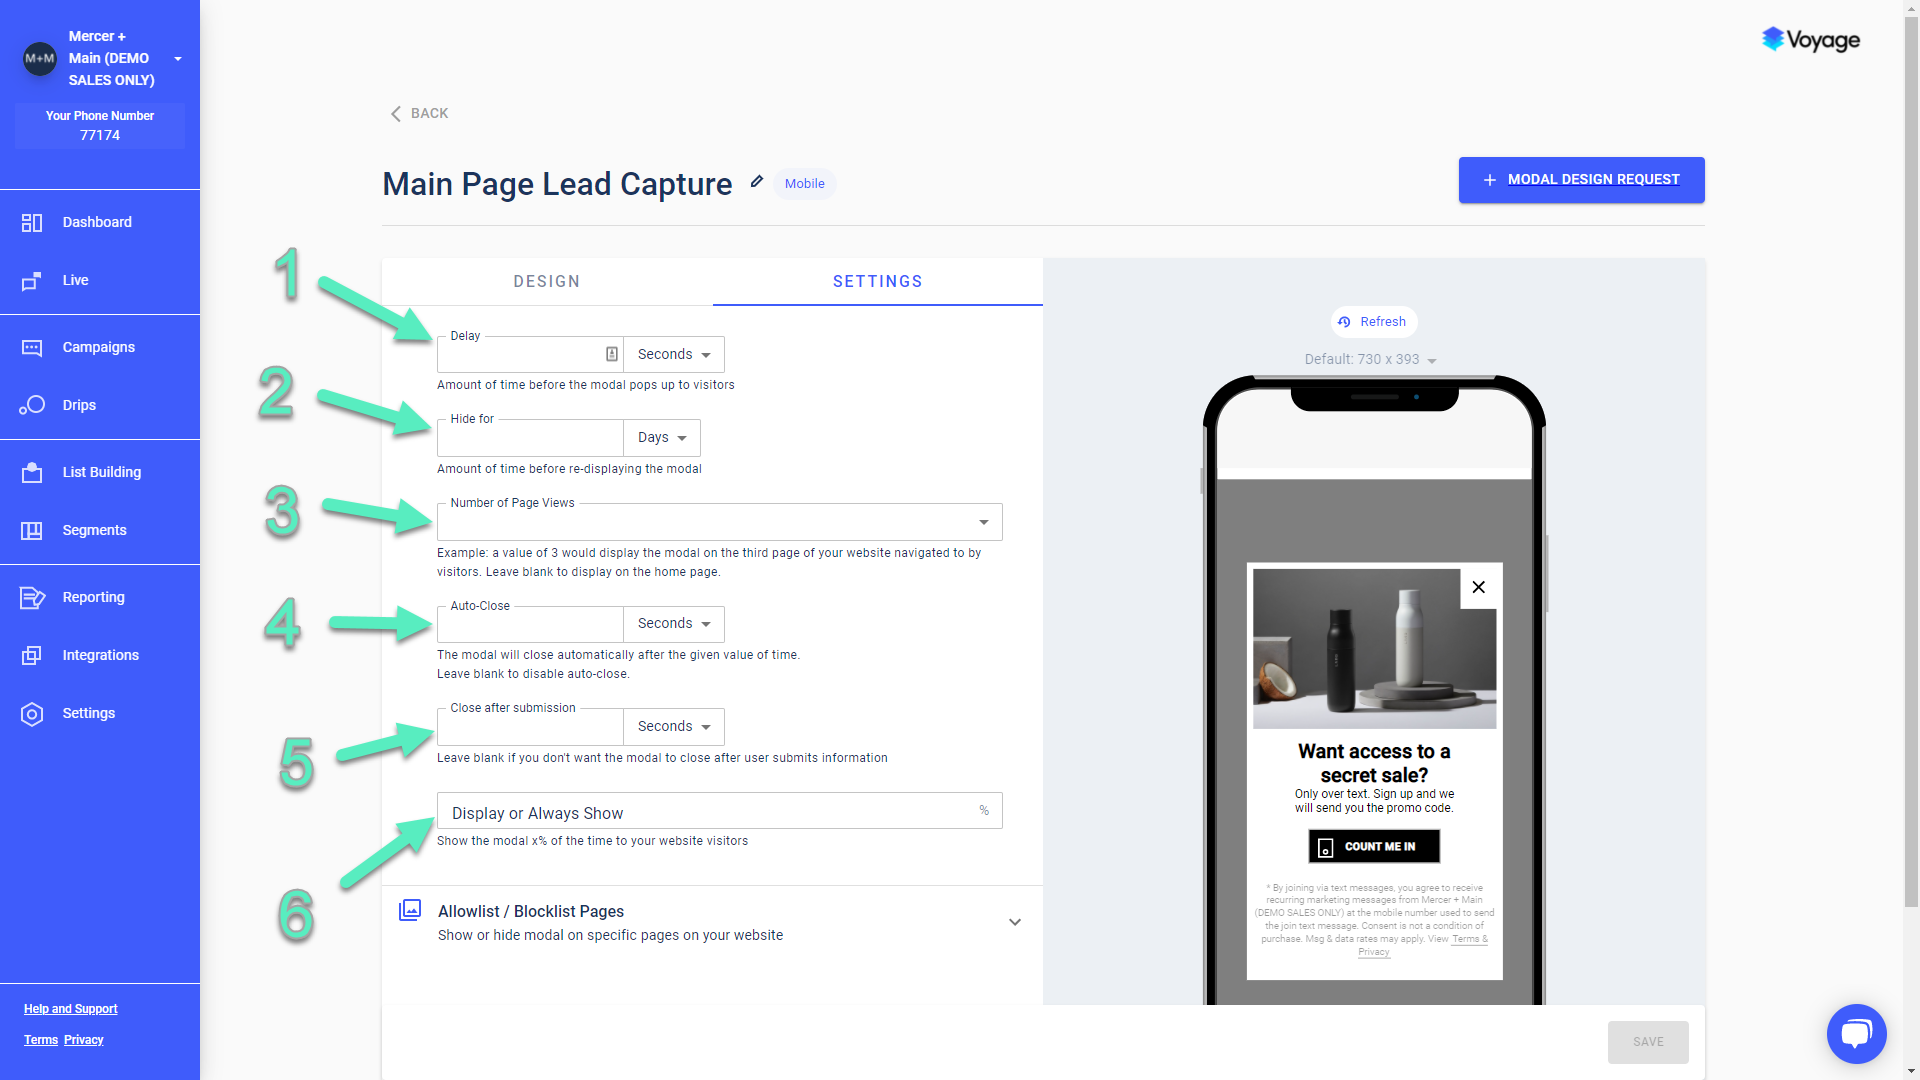
We have a separate article dedicated to configuring your Allowlist / Blocklist Pages.
Customer Opt-In Flow
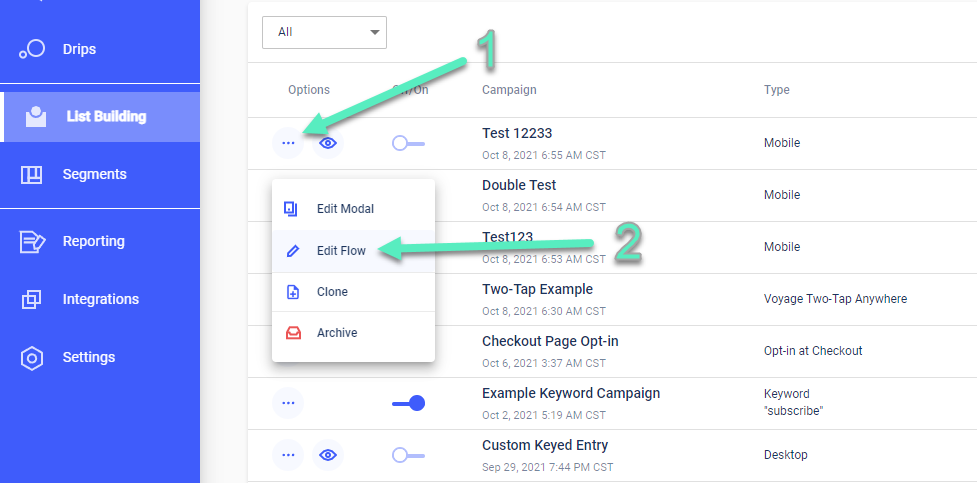
During modal creation, after you are done with Design/Settings, you'll move on to the Customer Opt-In flow configuration automatically. But if your List Building Campaign has been saved as a draft, you will need to navigate to the Opt-In flow by clicking on the ellipses [1] from the main List Building page, then select Edit Flow [2]:
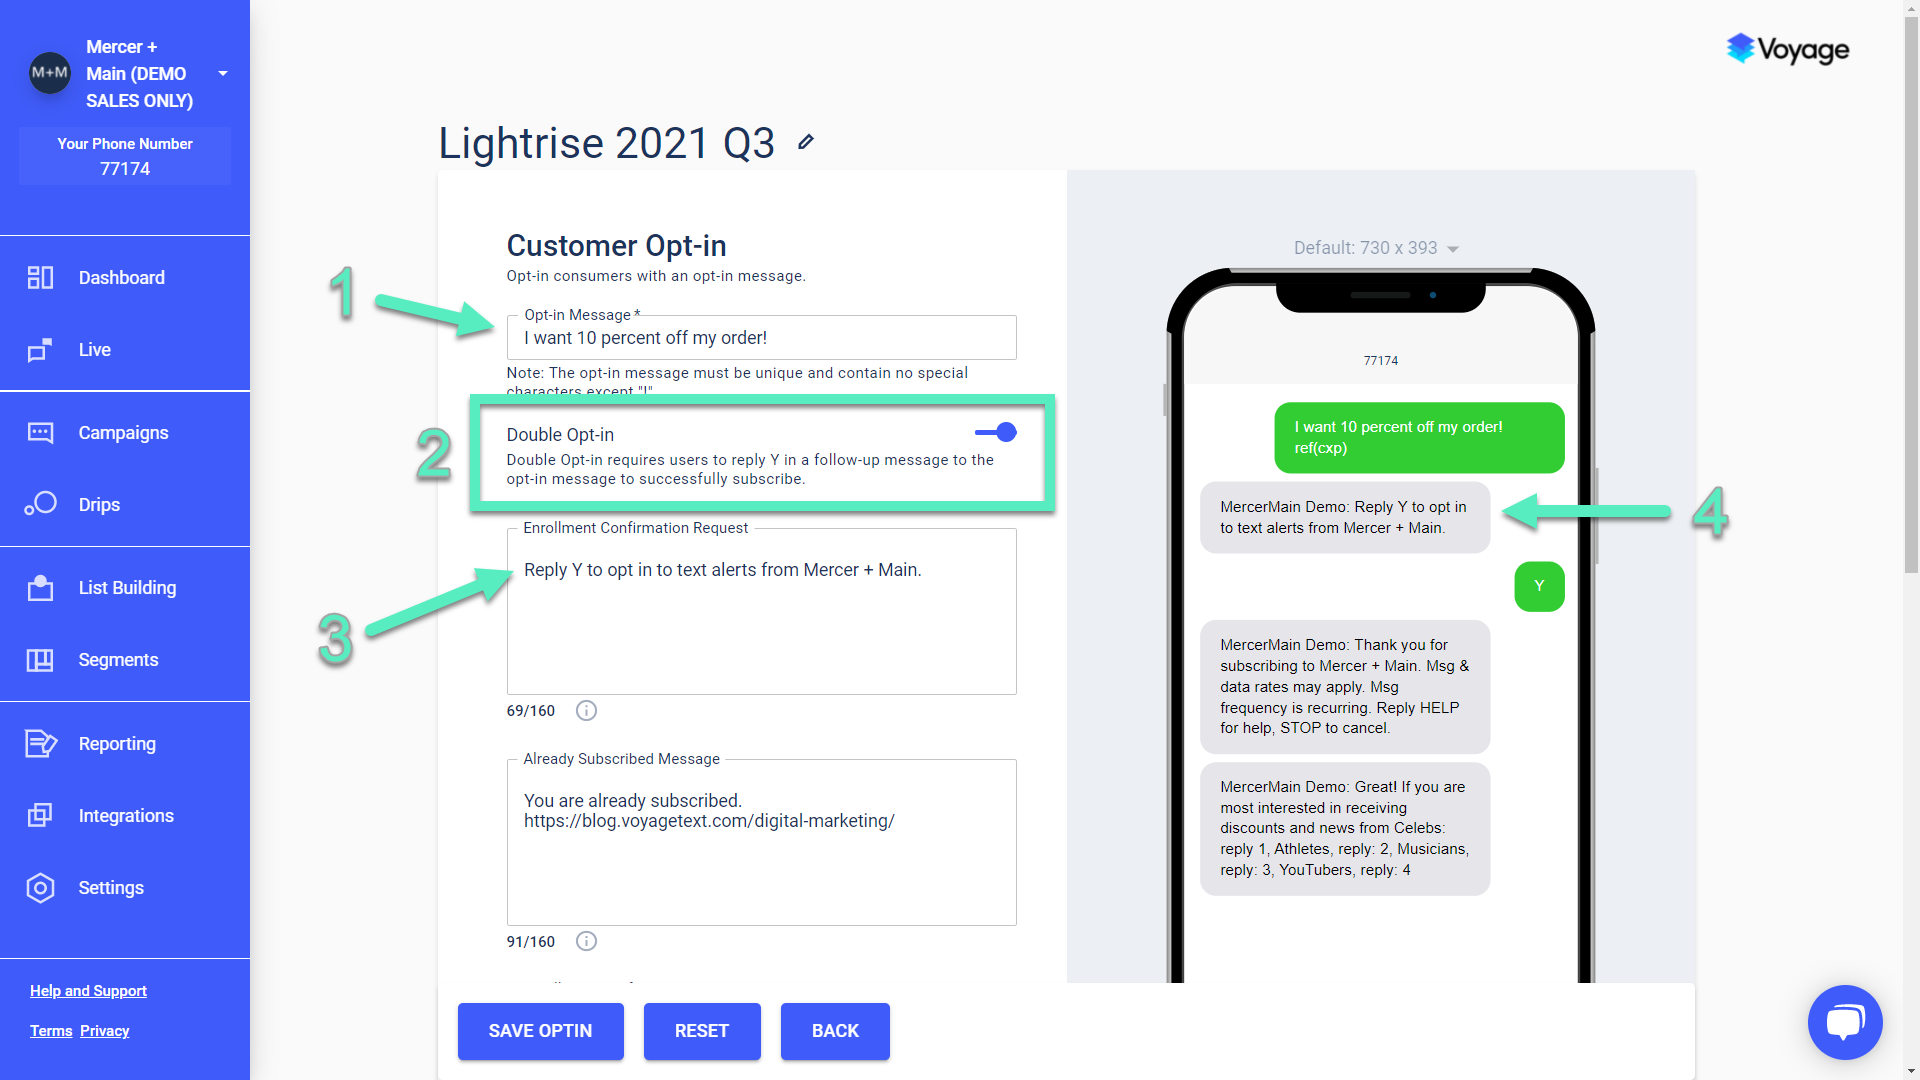
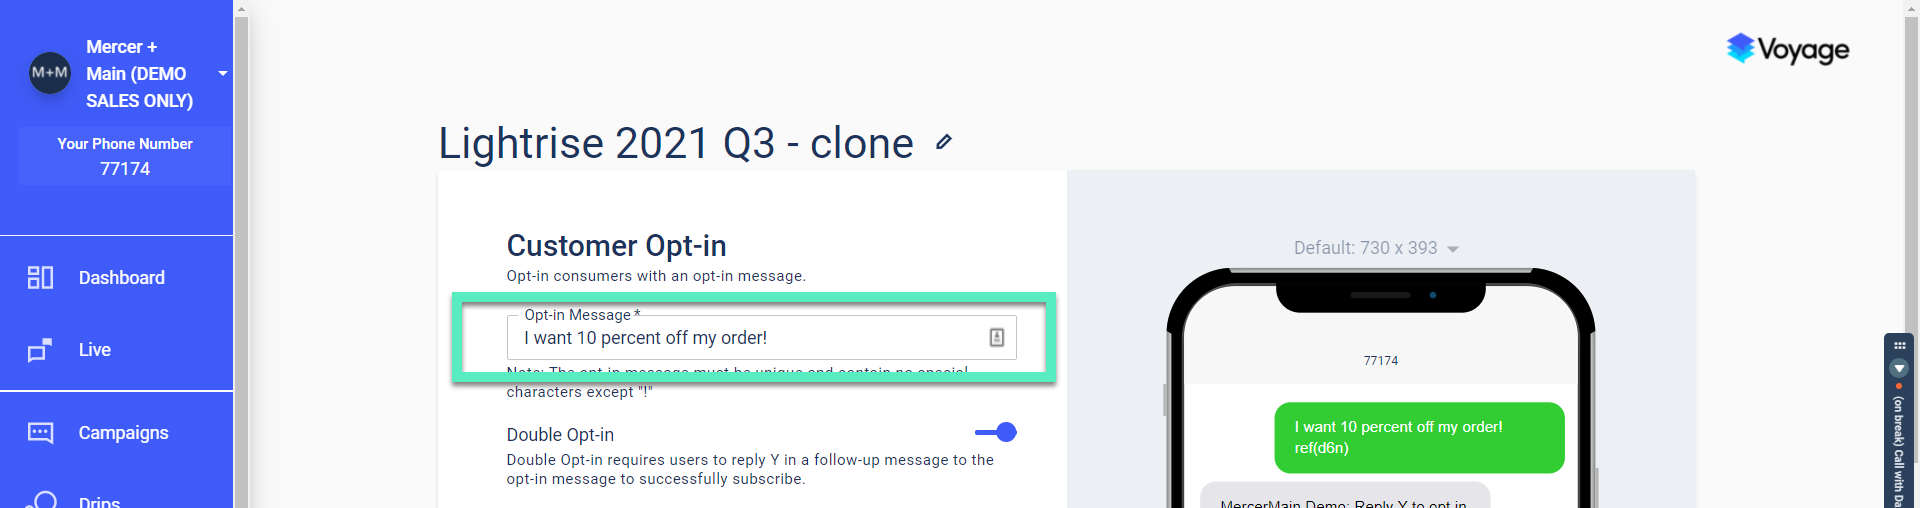
The Opt-In Message [1] is what the customer will send to you once they opt-in for SMS. It must be unique across all of your List Building campaigns and cannot contain any special characters. The Double Opt-In option [2] will require the user to send a follow-up message. You can customize the Double Opt-In text [3] and see a preview in real time [4]:
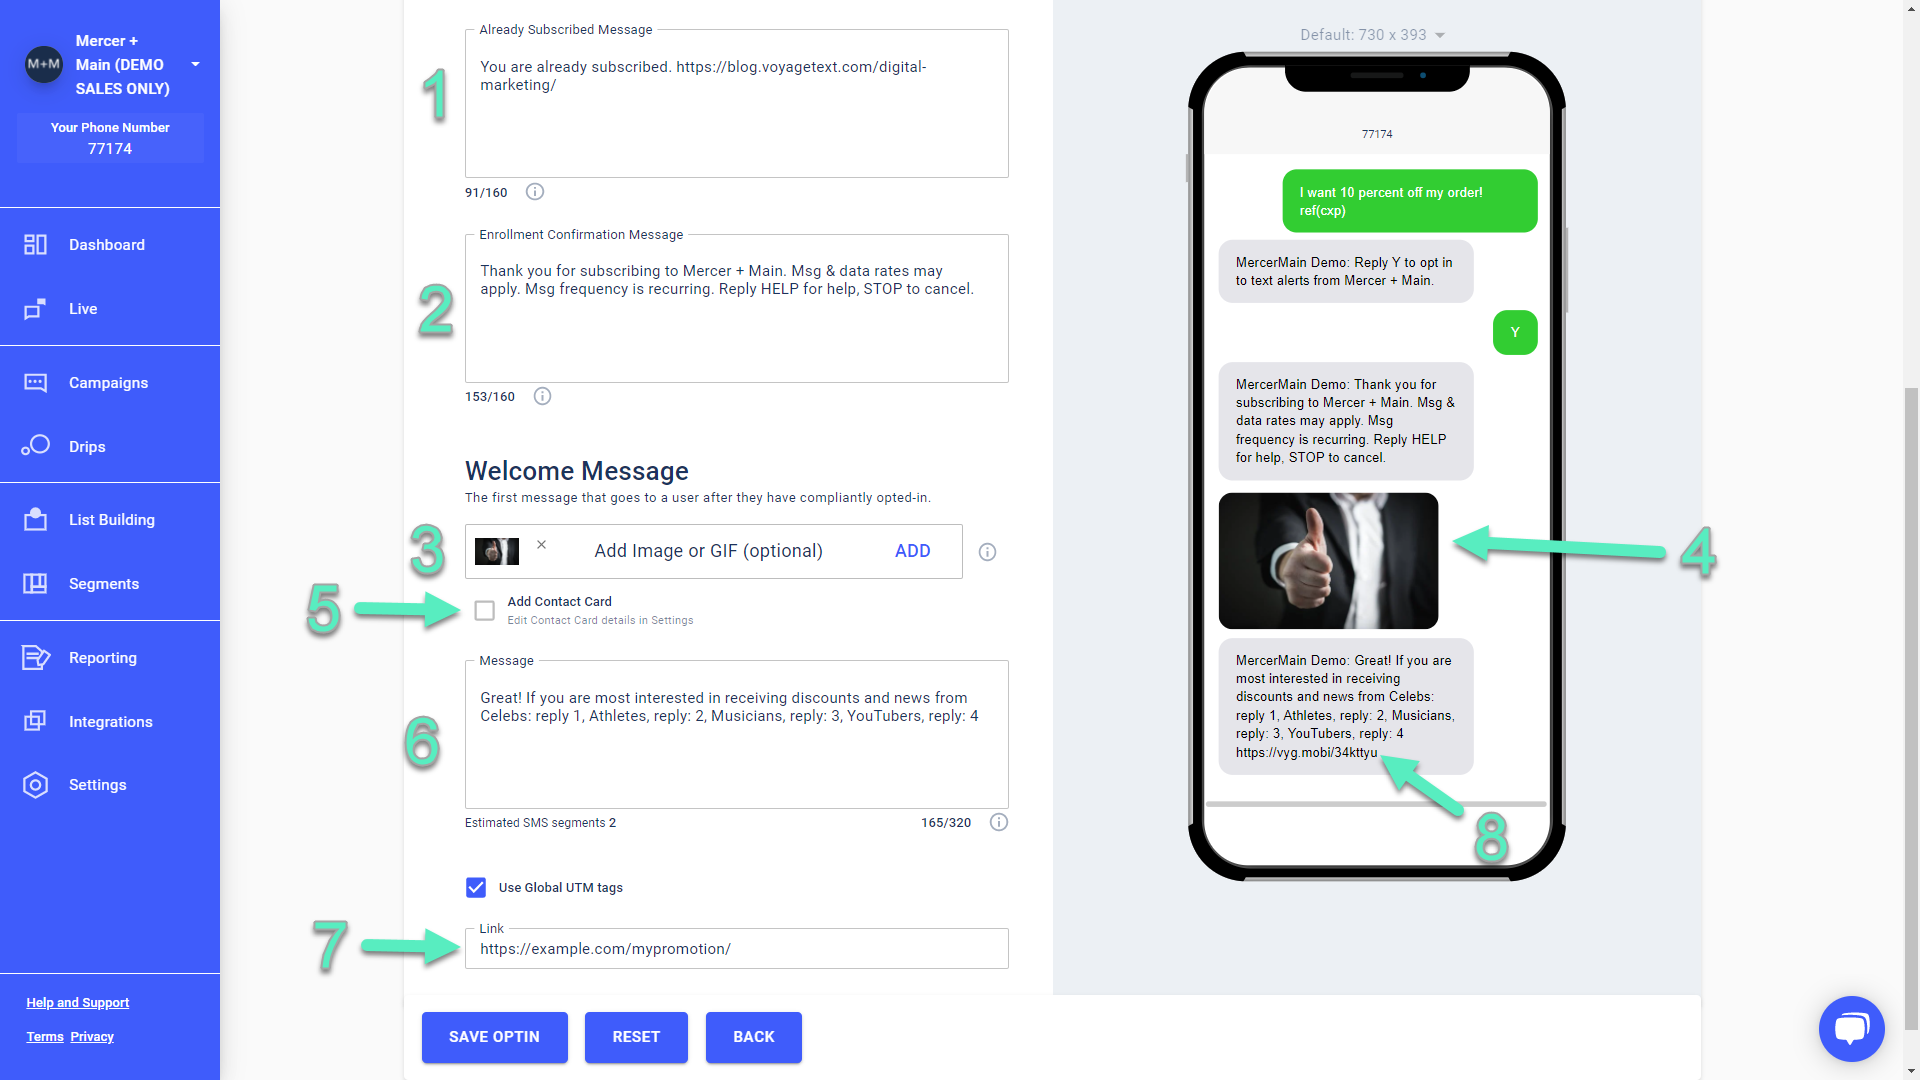
Customize the text shown when a user is already subscribed [1] (not shown in the preview), and alter your enrollment confirmation message here [2]. You can select a custom image to send [3] and see it's positioning in the preview [4]. The Add Contact Card checkbox [5] is dependent on information from your Voyage account Settings page. Finally, define your welcome message wording [6] and optionally include a link in your welcome message [7] that is automatically shortened [8]:
Defaults are populated according to your original account settings as coordinated with your Voyage account manager. Note: for the Voyage Dual-Tap Anywhere opt-in method, the opt-in message here must match the string coded in the button to work correctly.
Clicking Save Optin will apply your changes. Remember, all List Building campaigns are deactivated by default. Go to the the main List Building overview page to activate it.
Cloning a Modal
Cloning a modal is the easiest way to quickly build new modals and scale up your list building efforts for different audiences or contact opportunities.
As mentioned above, navigate first to the List Building page, click on the three dots to the far right for the campaign you wish to clone [1] and select Clone [2]. A new campaign will be created with the same name with "- clone" appended [3]:
Note that this new campaign has the same exact HTML code and other settings as the original campaign. There are certain important values that you should change, such as the the Campaign ID and Opt-In Message text.
First, click on Edit Flow under the three dots (ellipses) for the cloned campaign and select Edit Flow. You will be getting some additional information from the Opt-In Flow. Capture the Opt-In Message as this needs to be the same in the HTML as what was entered into this field:
Now go back to the main List Building campaign list, and click on Edit Modal under the ellipses for the cloned campaign. You can either edit the source code in Voyage or download it to edit in a 3rd party tool. We'll edit in in Voyage for our example.
In the Edit Markup page you will want to search for a line that contains "var smsText" [1] so you can replace the value [2] with the text you saved from the Opt-In flow. Also note the Campaign ID number [3]. Copy it, and search for instances of "campid" or "campaignid" in the code [4]. Replace any corresponding numbers [5] with the campaign ID you copied:

You may also want to look for the headline text [1] and subhead text [2] at this time, and adjust them accordingly. To find where that text is stored you can look for the code
[3]. You can modify the call to action text [4] by searching for
[5]:
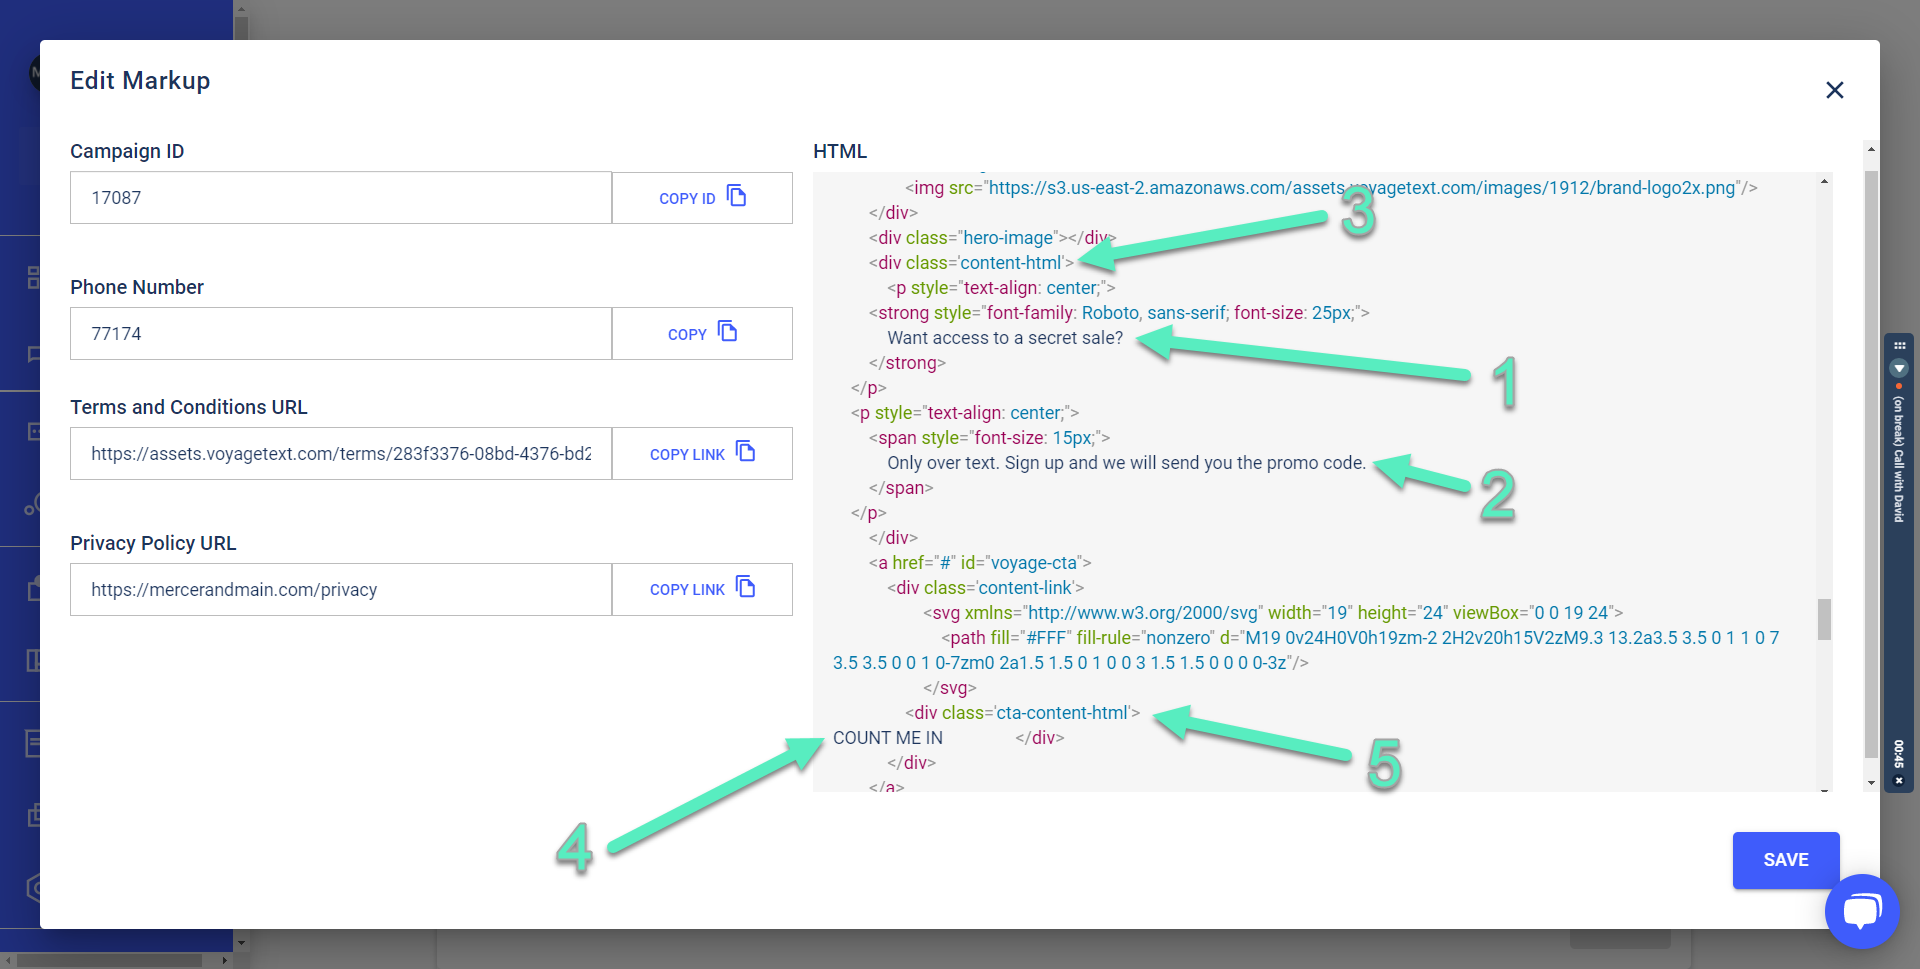
Scrolling up to the CSS portion of the file, you'll also likely want to swap out the hero background image. Search for .hero-image, background attribute [1], then replace the cloned URL with your own [2]. When you are done, click on Save [3]. Remember to check out the preview. If you are editing the code in an external editor, you'll need to upload your modified file:

Requesting a Voyage Modal Design
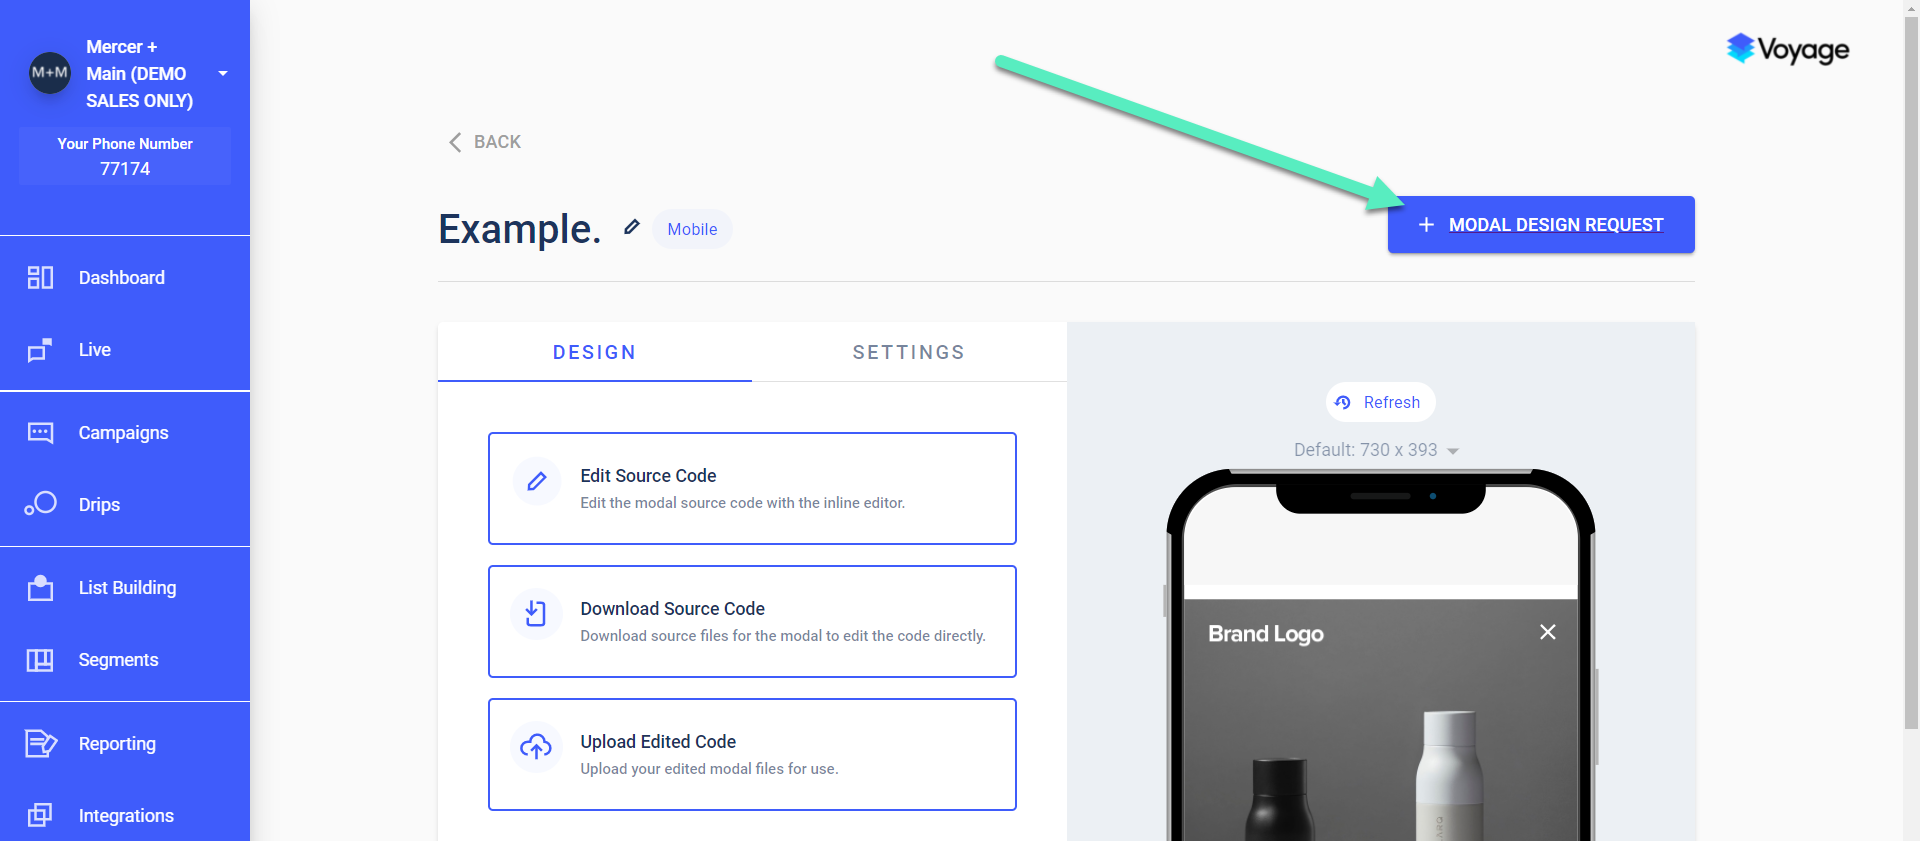
We have a built-in request form to make it very easy for you to request Modal design assistance from Voyage. As described above, navigate to the List Building page. Chose any modal you've started on, and click on the ellipses to expose the Edit Modal option. Click through till you see this page, and click on + MODAL DESIGN REQUEST in the top right corner:
You'll walk through a series of simple questions to help us get started.
When you are sending image files to Voyage we recommend a high resolution image size of 1080x1080 pixels. The product or main content should be in the center of the image with good padding on all sides around it so our design team can be flexible in design implementation.
Activate the Modal
If you requested a design from us, Voyage will upload the images and notify you when complete.
After images are uploaded go to the List Building page, locate your modal(s), and click the toggle to activate:
Learn more about setting up a Bubble Modal to further improve your customer experience.
FAQ
Q: How do I prevent the modal input field from zooming when viewed on a mobile device?
A: Zooming occurs on the input field when the font size of the text field is below 16px. Either increase the size of the font, or ensure you include or update the following tag in your
tag:
If you have any additional questions please contact us at [email protected].