Never miss out on an opportunity! Automate your followup messages with drips to ensure customers are given the additional assistance they need to complete their purchase. In this article, we'll show you how to set up automated SMS messages based on events triggered by your subscribers and even target specific subscribers with our segmentation builder.
Drips Overview and Navigation
With drips you can target specific customer segments or cast a wide net across the full customer journey. Drips are only activated when your subscribers perform a certain action (i.e. an event or "trigger"), such as viewing a product on your website or adding a product to their cart.
A few examples of drips use cases include:
Pre-Purchase
Abandoned Browse
Abandoned Cart
Abandoned Checkout
Product Review
And more!
There are three main steps to creating a drip: setting a trigger event, selecting your segment(s), and composing the message itself.
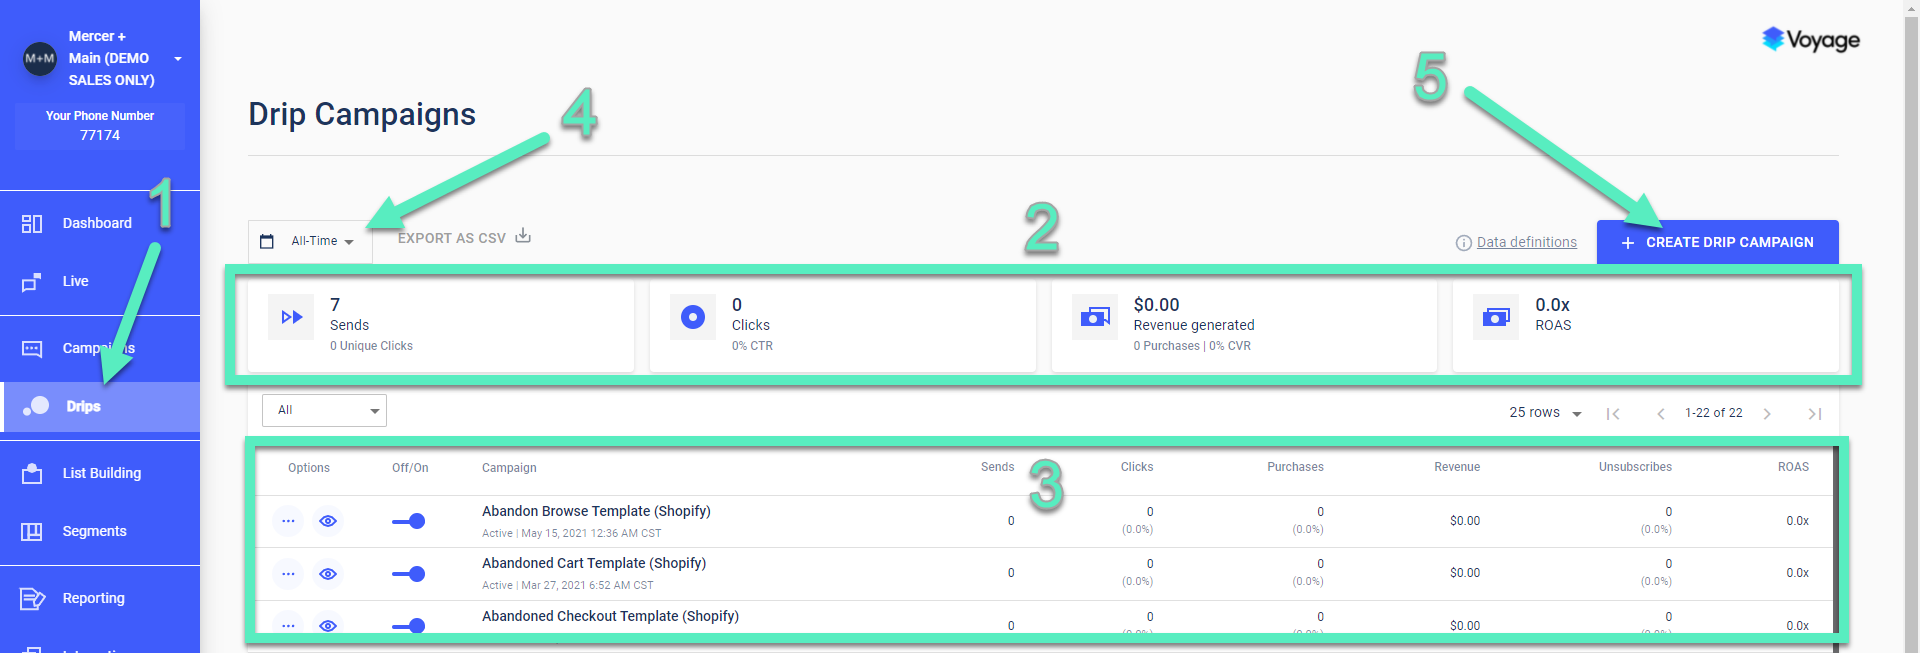
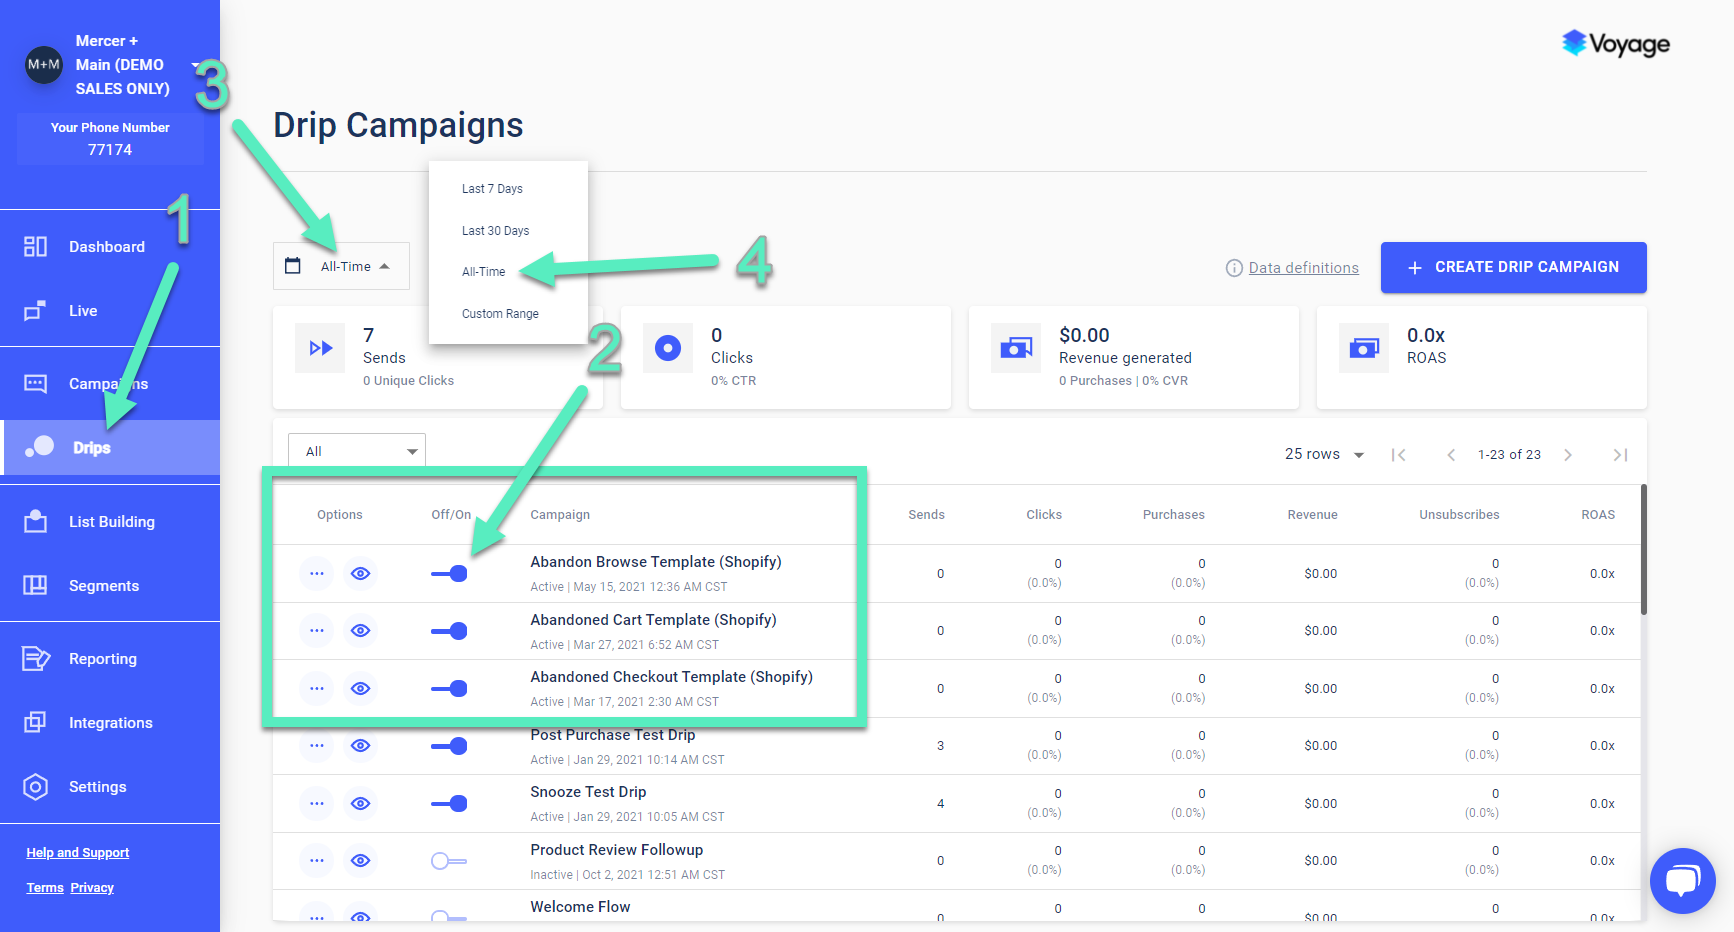
To access drips, click on the drips main menu item [1]. This is where you can see a summary of important metrics at the top [2] and a list of all other drips below [3]. If certain drip campaigns seem to be missing, ensure you have selected All-Time for the date range [4]. Click on Create drip Campaign [5] to follow along with the next step:
Integration Requirements
Abandoned checkout and abandoned cart both require a Shopify Integration or a BigCommerce Integration setup.
For the Abandoned Cart flow, it is required that the Voyage Global Tag is installed on the site to associate the cart with the Voyage subscriber.
For the Abandoned Checkout flow, we are limited by Shopify/BigCommerce's checkout flow settings. A phone number field is required in the checkout flow to successfully identify a Voyage subscriber to send these messages.
Post purchase: You have the option to use the app filter (placed order), Shopify filter (created order), or BigCommerce filter (placed order).
ASCN Limits: Be aware that as of early 2021, Abandoned Shopping Cart Notifications (ASCN) are limited to only one message, and the message must be sent within 48 hours. This applies to all ASCN drip campaigns, with or without this integration.
Custom platform dynamic variables: If you are looking to use dynamic variables, refer to our article on Dynamic Variables Custom Platforms.
Subscription started or cancelled: Consider integrating with Recharge if you'd like to use subscription started or subscription cancelled events.
Creating a Drip
As shown above, to begin creating a drip you'll need to click Create Drip Campaign, then give your drip a name. Each section below will go into more detail for each subsequent step:

Trigger Events
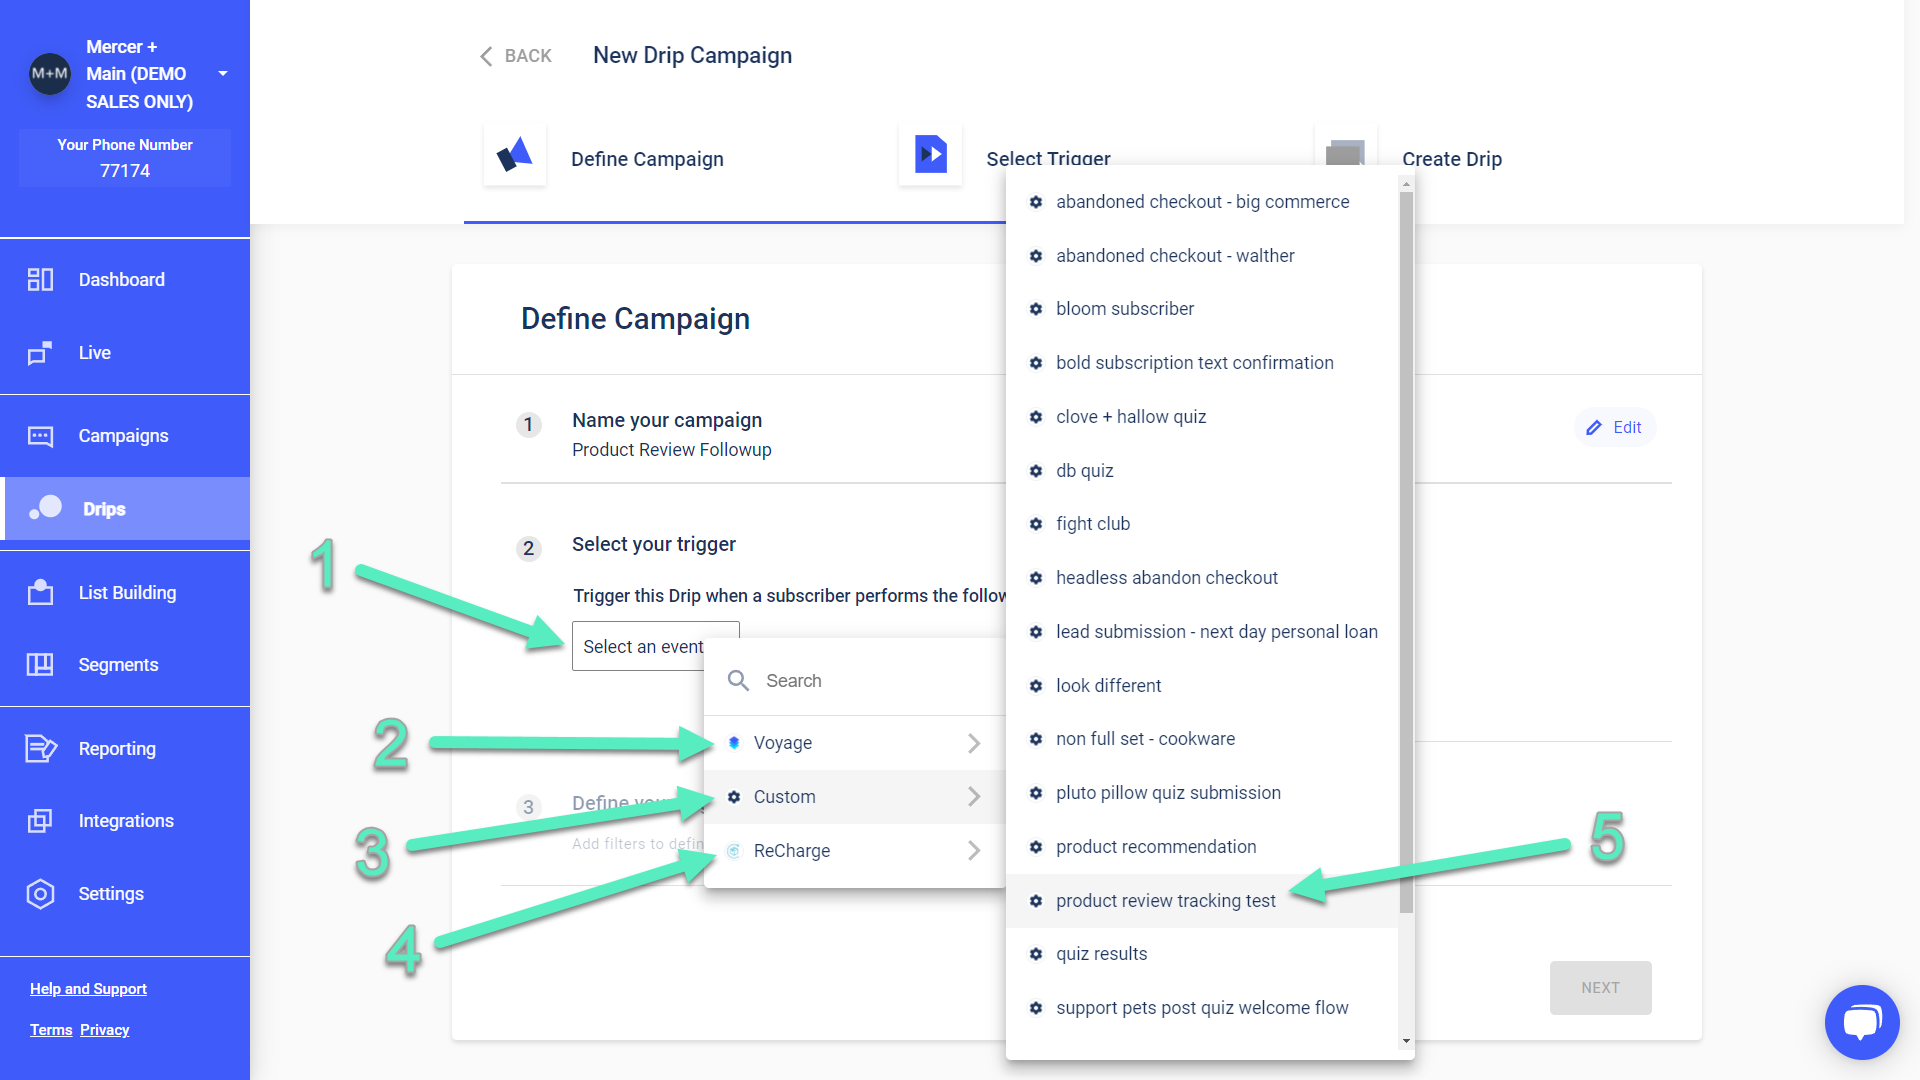
The next step to creating a drip requires you to chose one trigger [1] that will initiate your series of automated SMS messages. There are several built-in Voyage triggers [2], and in our example we've created some custom triggers [3]. If you have any integrations, you may also see those triggers appear here as well [4]. In our case, we're selecting our custom product review tracking trigger [5]:
You can read a full list of the events available in Voyage SMS. Here is sample of some of the more common events you might see:
Data Source | Trigger Event | Explanation |
Voyage | Clicked on campaign | When a subscriber clicks on a link in a campaign. |
Voyage | Placed order | When a subscriber places an order on your website (tracked with the Voyage Pixel). |
Voyage | Subscribed | When a person opts into your SMS program and becomes a subscriber. |
Voyage | Viewed product | When a user views a product on your website. This trigger is used for the Abandoned Browse use case. |
Shopify | Added to cart | When a user adds, removes, or modifies an item in their cart.This trigger is used for the Abandoned Cart use case. |
Shopify | Order cancelled | When a subscriber cancels their order |
Shopify | Order delivered | When an order has been successfully delivered to a subscriber |
Shopify | Order refunded | When a refund has been successfully issued to a subscriber |
Shopify | Order shipped | When an has been successfully shipped to a subscriber |
Shopify | Placed order | When a subscriber places an order on your website (tracked with the Voyage Pixel). |
*Any update to these events while a user is in a queue will ensure the user doesn't get duplicate messages. An example for updated cart — if a cart is updated by a user at 12:00 pm and updated by the same user at 12:05 pm, the drip queue delay will update to start from 12:05pm instead of 12:00pm.
Trigger Filters
Trigger filters allow you to add an extra layer of sophistication to your selected trigger. For example, if you select the Voyage trigger "placed order", this drip will trigger any time a subscriber places any kind of order.
However, you can add a filter "Order Total" to the trigger "placed order" and indicate a value. For example, you can set up the drip so it will only trigger when a subscriber places an order that is greater than $100.
After choosing a trigger, you may see the option to add additional filters [1] depending on the trigger itself. For each filter you add, you'll need to select the field [2], the logic [3], and the value itself [4]. There is no limit to the number of filters you can add, but if you need to remove a filter just click on the red trash can icon [5]. When you are done, click Next [6]:

Note: Not every trigger contains filters. In these cases, you will not see the "Add Filter" button.
Segment Selection
Segments let you further refine who will receive these drips, beyond just those filters contained in triggers. You can read more about segmentation best practices here.
For event and date type segment filters, you can also choose the option since starting the drip. This date will be dynamic to the consumer and is determined by when the consumer "enters the drip" (i.e., becomes eligible as determined by the trigger event).
Exit events can also be defined in segmentation filters. When an exit event fires, the upcoming drip message(s) are cancelled and the user is removed from the drip.
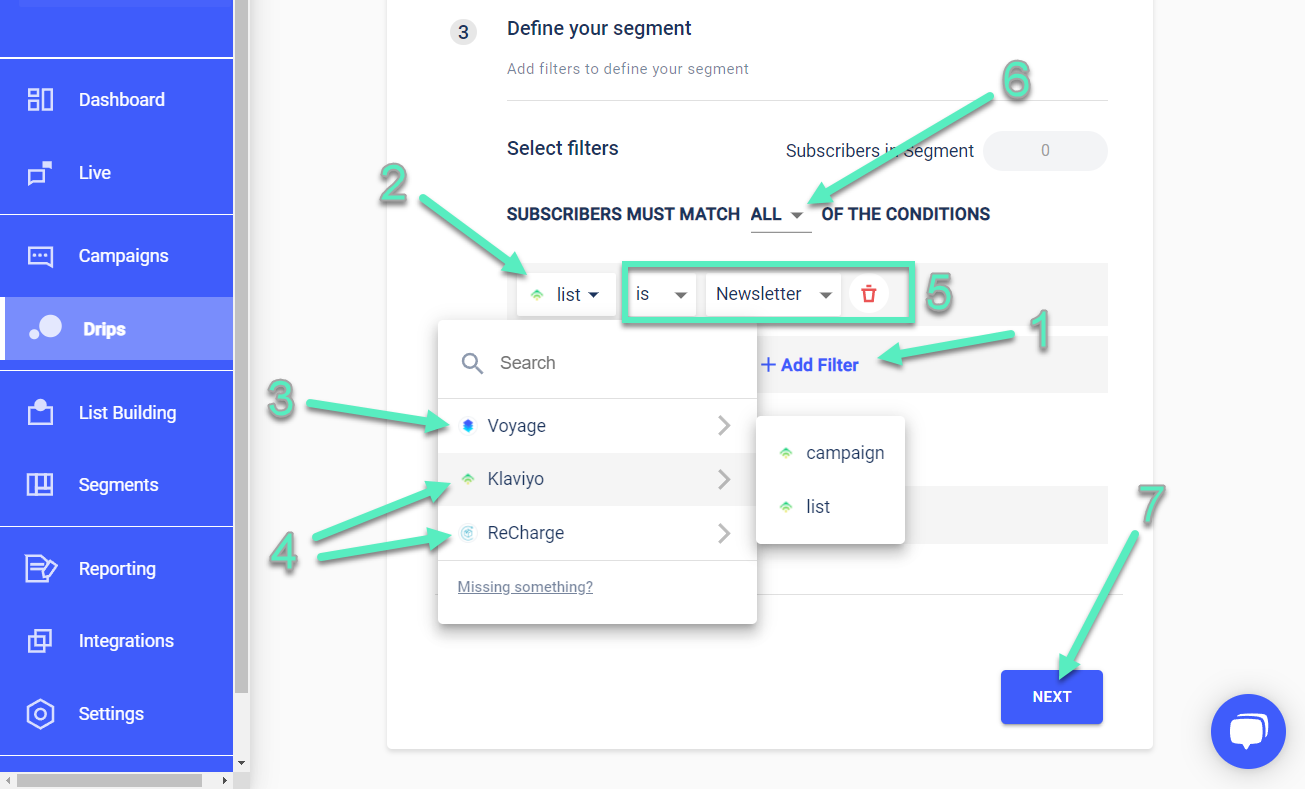
Again, click on Add Filter [1] and click on the drop down menu [2]. You can select Voyage's built-in filters [3], or if you have any integrations you'll see their segmentation selections here as well [4]. Once you chose a filter, you'll be presented with a series of other selections to complete the logical filter match [5]. You can also change your filter list from being all filters required, or one filter required [6]. When you are done, click Next [7]:
Compose Message
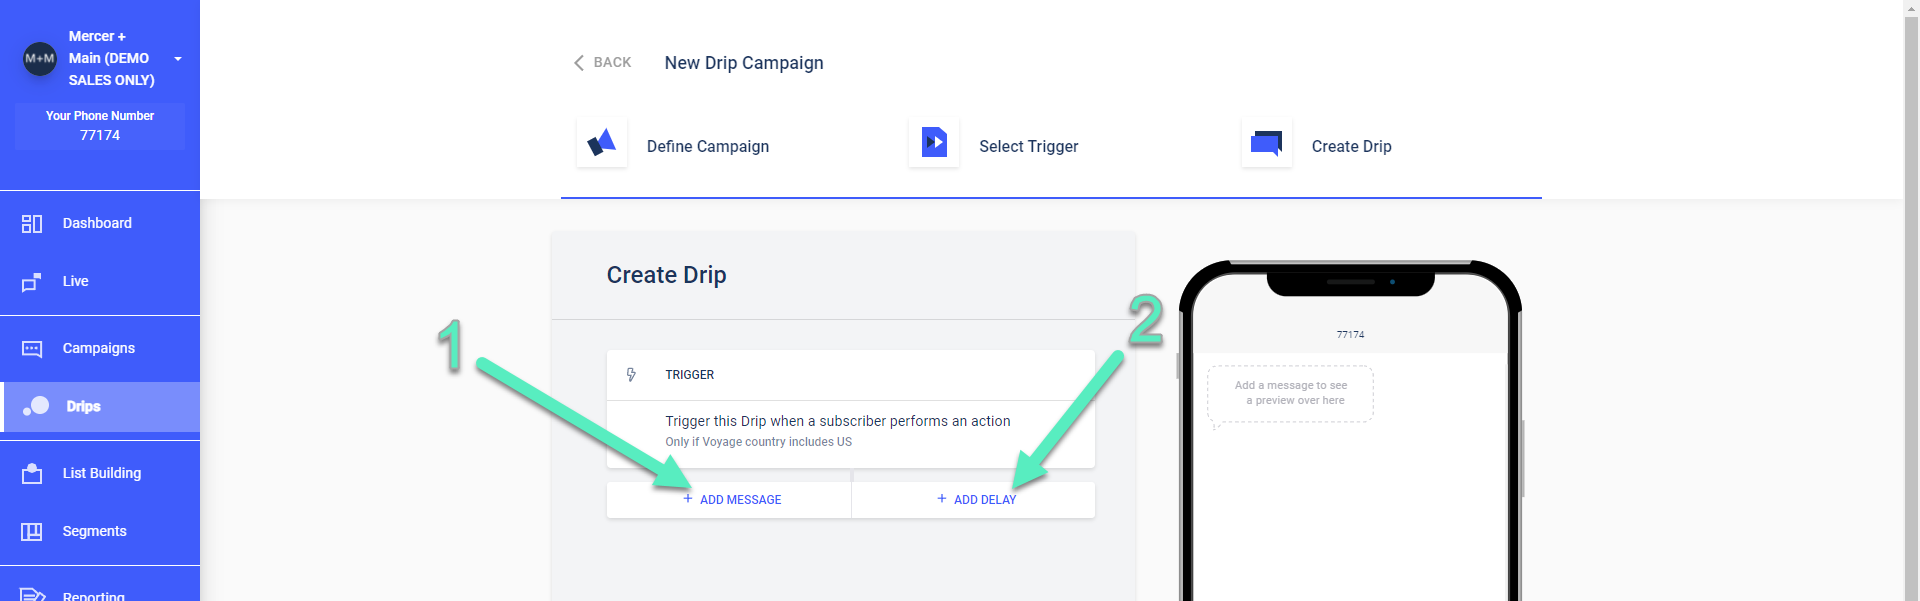
The next page will let you add messages [1] and delays [2] to your drip. Start by adding a delay [2]:
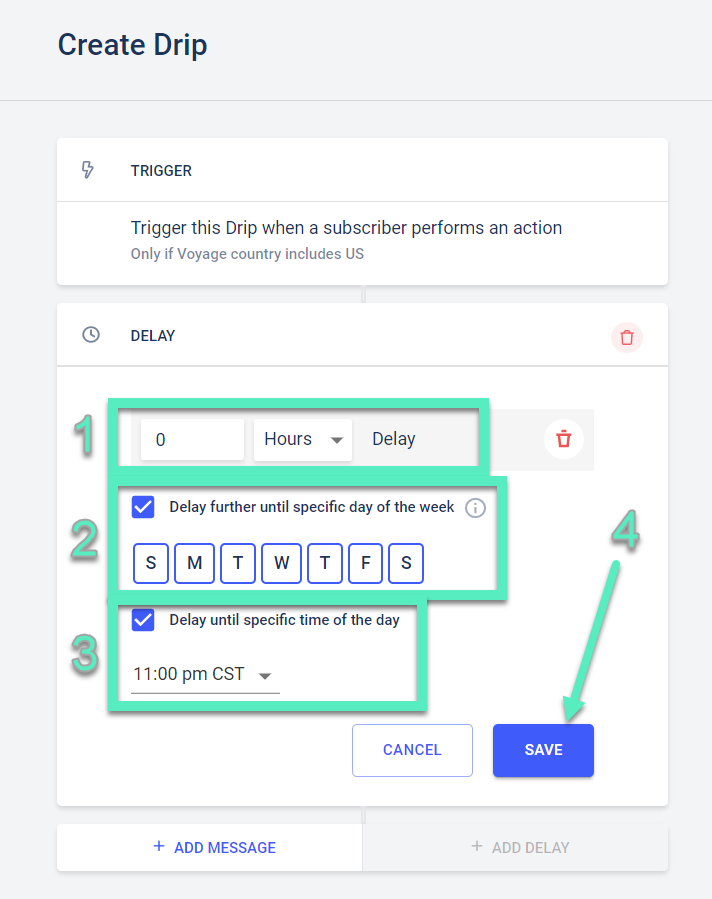
The first delay determines how long after the trigger before your first message is sent. You can delay a set number of minutes, hours, or days [1]. It is also possible to remove certain days of the week so messages are not sent on those days [2]. Or you can delay until after a specific time of the day [3]. When you are happy with your settings click Save [4]:
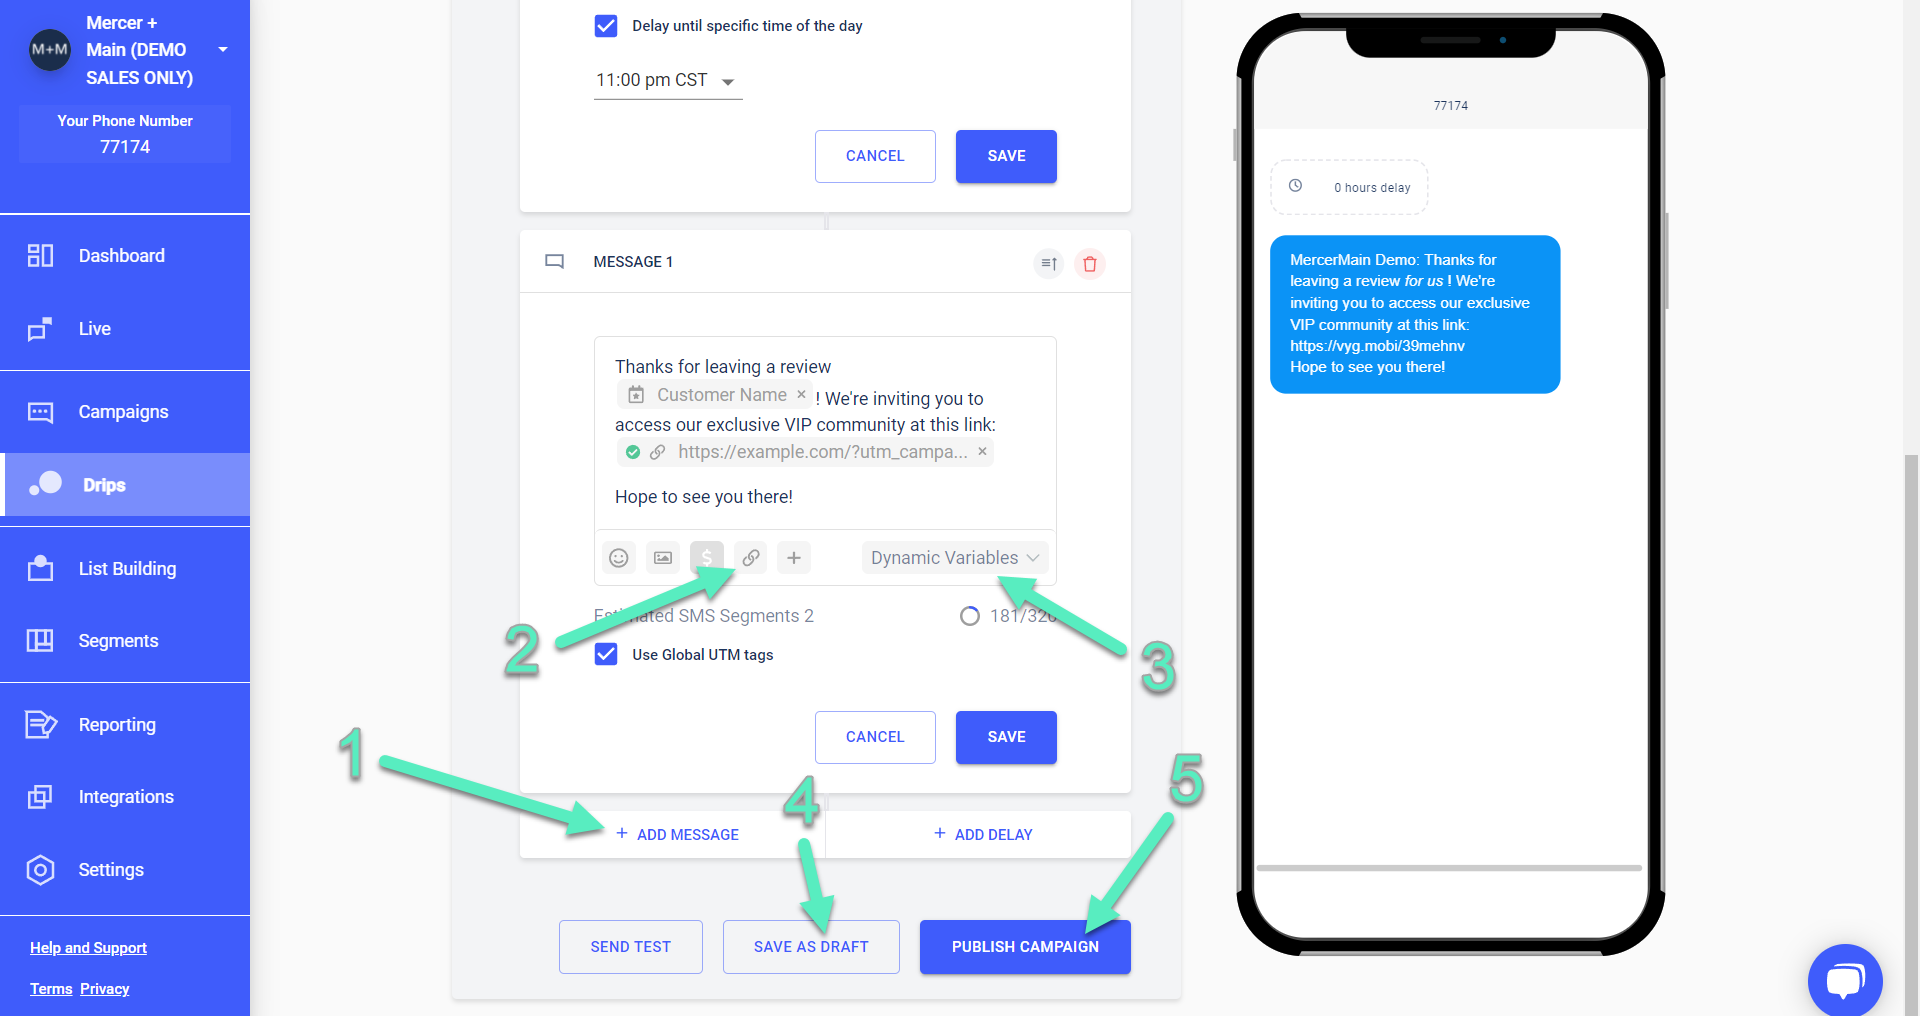
Now you can Add a Message [1]. You'll see the message appear in order below your delay. Remember, you should add a delay between each message in your drip. For certain drip types, such as abandoned browse flows, you may see an additional option "Use Product Image" that sends the last viewed product image with your message. Remember to add a landing page link [2] if you are not using dynamic variable links in your message. Dynamic Variables [3] will depend on the filters you've selected, but they are potentially a powerful way to customize your message and make it even easier for your subscriber to complete the desired action. You can either Save [4] and continue later, or Publish Campaign [5]:
Clicking on Save within a message or delay will collapse the window so it is easier to see your entire drip flow from start to finish. You can add additional delays and messages as needed to complete your drip, keeping in mind industry limits.
Trigger Filters vs Segment Filters
It is important to understand the difference between these two types of filters.
Event or trigger filters only filter based on the first stage (or message) because they check the initial event that occurs. But subsequent messages in a Drip will only be sent if that initial message is sent. It can help to think of it as a chain of messages, where the links between each are the delays. If the first message isn’t sent, the chain ceases to continue. A full list of our trigger filters is here.
Segmentation filters on the other hand are checked before each message because they filter based on the subscriber’s attributes or actions since the Drip started.i.e. Think of that same chain but before each message in the chain is about to be sent the segmentation criteria is evaluated to determine whether or not to continue the chain. If the subscriber fails to meet the criteria, the chain ceases to continue. You can see a full list of our segment filters here.
Drip Templates
Every Voyage account comes prepopulated with a selection of common drip campaign templates to make it easier for your to clone them and adapt them to your specific use case.
Enter your Drips dashboard [1] to review these templates. All the drip templates can be toggled on or off as needed [2]. Select the ones you'd like to use to target your customers. If you are not seeing one or more of the templates, be sure you have your date range selection [3] set to All-Time [4]:
Best Practices:
We recommend that you start with abandoned browse and checkout.
Your active subscribers (who haven't unsubscribed) are some of the highest intent users. Don't be shy to target them with drip messages.
SMS delivery relies on cell phone carriers. Delay times may be slightly shorter or longer depending on the carrier.
For each drip flow we recommend having 3 messages in your series (except for abandonded cart drips, which are limited to 1 message).
Abandoned Browse
The abandoned browse template has the "viewed product" trigger selected, and a number of appropriate exclusion filters applied:

The abandon browse template also has three delays and three messages you can modify and expand upon to easily customize your own abandon browse drip campaign.
Note: If your abandoned browse drips aren't sending, you may need to ensure your site code is configured properly. Click here for more details on the "product viewed" event trigger.
Best Practices:
Personalize
Remember that dynamic variables are different based on your selected trigger event.
##{{Url}} - This is your most crucial CTA to link your customers back to their correct product page
"Use Product Image" checkbox - An image of the customer's last viewed product is a great draw.
##{{ProductTitle}} - Enter even useful information about the last viewed product to catch their attention.
Incentivize - Abandoned browse customers will show higher conversion with free shipping or a promotional discount. Here are two incentivized flows to consider:
Use a promotional discount or incentive in the first or second message, and increase the offer value in the last message.
Use reminders in the earlier messages, and save the promotional discount/incentive for the very last message.
Abandoned Checkout
The abandoned checkout template has "updated checkout" for a trigger and several delays and messages to get you started:

Best Practices:
Personalize
Remember that dynamic variables are different based on your selected trigger event.
##{{Url}} - This is your most crucial CTA to link your customers back to their checkout page
##{{FirstName}} - Personalization is key in effective SMS marketing. Keep in mind that if we don't have a first name for a particular subscriber, this field will revert to the default value you select in their message. For example: "Hi ##{{firstname}}, checkout our new offer:" with a default value of "there" would become "Hi there, checkout our new offer" for users that haven't given us their first name.
Urgency - Use a time-sensitive wording, for example: "your cart will expire soon" and "don't forget to checkout your cart."
Incentivize - Free shipping and promotional discounts are great. Consider incentivizing after the first reminder message. Checkout customers show high intent.
The difference between Abandoned Checkout and Abandoned Cart:
Abandoned Checkout - After updating their cart, your customer advances to your checkout page, but does not make a purchase within a set amount of time.
Abandoned Cart - Your customer updates their cart on your website, for example by adding a product, but does not make a purchase within a set amount of time and does not advance to the checkout page.
Abandoned Cart
This template has a trigger when someone performs an updated cart action:

Best Practices:
Limited to 1 message only by industry standards
There isn't a URL dynamic variable available for this trigger. Instead link to your cart or homepage. Example: https://www.mercerandmain.com/cart
Reference the Best Practices found in the Abandoned Checkout section for more ideas
Learn More
If you have any additional questions please contact us at [email protected].